Many of us think because we had loving parents that we didn’t have trauma. This is simply untrue. Until we do something to heal that trauma, the belief systems that were created as a result (I’m not good enough, I’m a burden, etc) will continue to be the lens from which you view the world. Hypnotherapy allows you to return to the moments when these maladaptive belief systems were created so that you can change them with your now-adult mind.
Reach out if you’d like to schedule some virtual hypnotherapy. This is one of the most powerful tools for getting underneath our maladaptive belief systems and allowing suppressed emotions to release. Please don’t let money be a barrier for this. I have sliding scale options and will work out any kind of payment plan you need if you feel ready to do your personal work.
Can you imagine what the world would be like if we all did our work?
When I first started on my healing path, it took me a long time to learn how to be in my body. I didn’t even realize I had been OUT of my body until I really dove into hypnotherapy, and eventually my clinical hypnotherapist training as a result of my crippling anxiety, depression, and digestive issues. Trauma often forces us out of our bodies and can make it uncomfortable to return. At first, it may have been a protective mechanism in response to trauma. But later, that mind-body disconnection can often turn into anxiety, depression, autoimmunity, and other chronic conditions.
Breathwork was one of the tools that REALLY helped me be in my body fully, which is where emotions live, which is why I (and so many) avoided being there for so long. But if we don’t release these pressure-cooked emotions, they end up being destructive, not just to you, but to those around you who are victims of those emotions coming out sideways.
What is breathwork?
Breathwork is a pattern of breathing that elicits non ordinary states of consciousness (also called holotropic breath work). Naturally occurring DMT (dimethyltriptamine) is created in our lungs and we release it when we breathe this pattern. The purpose of Breathwork is healing, integrating, and purifying. We learn who we are, and who we are not. We have a corrective experience of our breath, imprinting from a place of awareness, enlisting inner and outer resources. We do it to free ourselves from the conditioning, patterning and imprinting that we were given before we had any choice.
Group sessions are about 2 hours. We’ll join on Zoom and begin with instruction on how to do the breathing pattern. I’ll then start a playlist of songs meant to help move your breath. You’ll breath for about 75 minutes (everyone’s microphones will be muted so you will only hear the music, but if you have questions I’ll be monitoring and can communicate through the chat feature on Zoom) in a comfortable space you’ve created in your home (laying on a mat or flat surface is ideal). During this time many people experience different things – please read this FAQ about Breathwork. Once the 75 minutes have passed and the music stops, we’ll join back together for an optional group sharing. Many people have transformational experiences and it’s beautiful to process as a group.
If you would like to join me and other truth-seekers in one of these online Breathwork sessions, schedule below. From the comfort of your home, you can drop into a deeper state of awareness, release what no longer serves you, and connect with a group of like-minded people who are doing their personal work. And? It’s only $30.
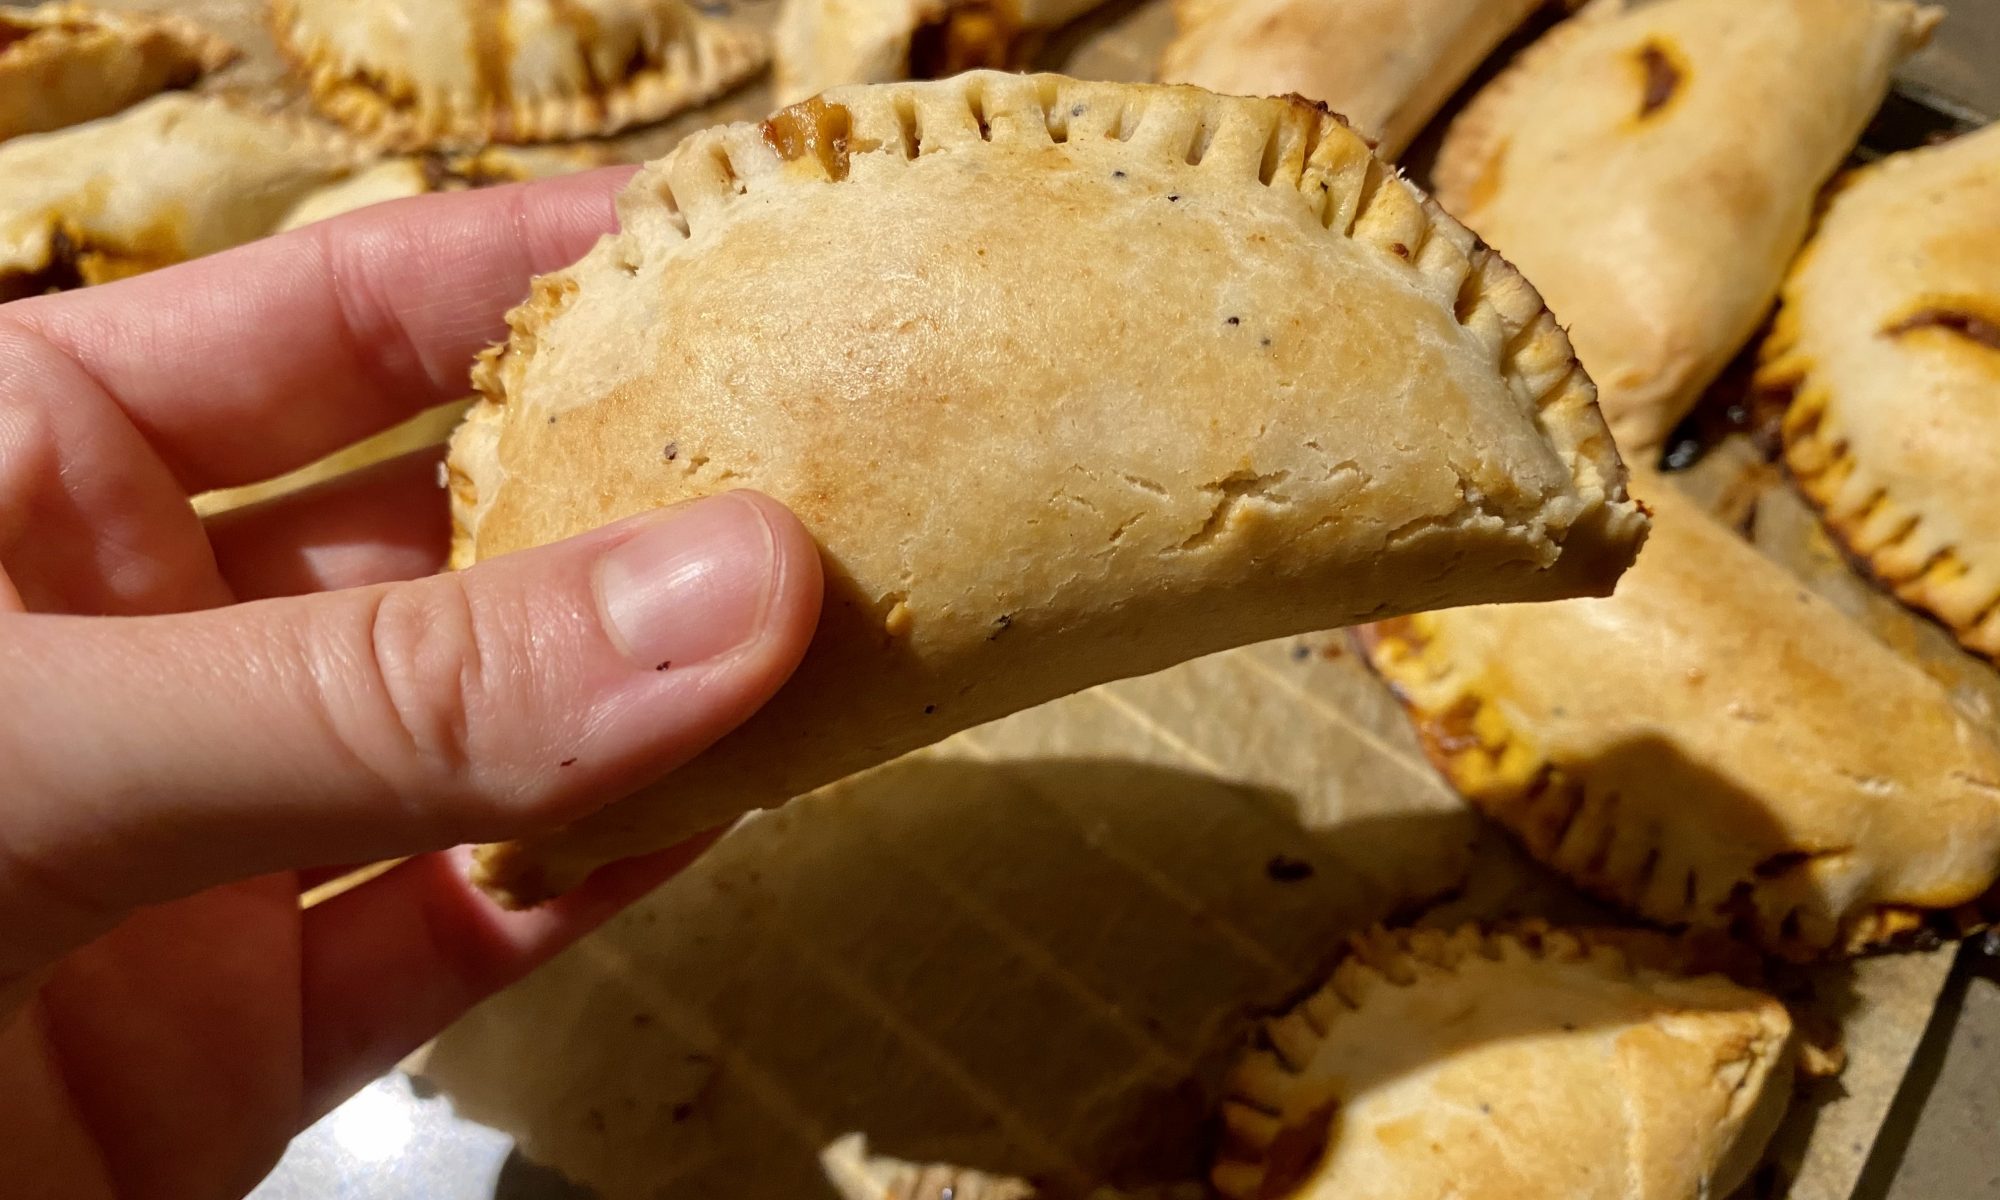
My partner is from Argentina and every time we visit I love sampling the different varieties of empanadas, a traditional Argentine favorite. They even have gluten-free bakeries that sell them as gluten-intolerance has started rearing it's ugly head in South America. I have to say, this recipe takes the cake for my favorite homemade gluten-free empanada, and I even make them with Beyond Beef so they're completely plant-based. I hope you enjoy them as much as we do!
Prep Time45 minutesmins
Cook Time3 hourshrs
Total Time3 hourshrs45 minutesmins
Course: Main Course, Snack
Cuisine: Argentine
Keyword: empanada
Equipment
Rolling Pin
parchment paper
Ingredients
3Tbsp.extra-virgin olive oil or avocado oildivided
1lb.ground Beyond Beef – or bison / grass-fed ground beef for non-vegan
1large onionchopped
2small red bell peppersseeded, chopped
1tbspminced garlic
Sea saltfreshly ground pepper
3Tbsp.ground cumin
2Tbsp.sweet paprika
1.5Tbsp.dried oregano
¼tsp.cayenne pepper
3tbsptomato paste + 1/2 cup wateror 1/2 cup tomato sauce
1cupveggie stock or broth
2tspcoconut sugar
1/2cupcilantrochopped
1cupfrozen peas / corn
Optional- 1/2 cup chopped banana peppers
1batch gluten-free pastry dough, chilled for 1 hour
For traditional Argentine-style: ½ cup pitted green olivesPicholine or Spanish, rinsed well, cut in half lengthwise
1egg yolk + 1 tbsp non-dairy milk for egg washomit for vegan
Instructions
Heat 2 Tbsp. oil in a large pot over high. Cook beef, breaking up with a spoon, until browned but not completely cooked through, 6–8 minutes. Transfer to a medium bowl with a slotted spoon, leaving as much fat in pan as possible.
Reduce heat to medium and cook onion for 5 minutes in the remaining 1 Tbsp. oil, then add bell peppers and garlic stirring until tender but not browned, another 3-5 minutes. Season with salt and black pepper.
Add cumin, paprika, oregano, and cayenne and cook, stirring, until fragrant, about 1 minute. Add tomato paste/sauce, veggie stock and reserved beef along with any accumulated juices to pot. Stir in sugar, 2 tsp. salt, and ¼ tsp. black pepper. Bring to a simmer and cook, stirring and scraping up any brown bits, until most of the liquid is evaporated, 15–20 minutes; taste and season with salt and black pepper, if needed. Stir in peas, corn, cilantro, and banana peppers. Transfer to a medium bowl, cover, and chill at least 3 hours.
While the filling is chilling, remove the chilled pastry dough from fridge and sit at room temp for 15 minutes. Place 2 large pieces of parchment paper in a work area and remove one round of dough. Place between parchment paper and roll out until 1/8 inch thick. If it breaks apart, knead in hands until it softens more. Cut with something circular and about 4 inches in diameter (I used a glass pyrex dish). Place between parchment paper or plastic wrap and stack with one layer of wrap between each completed round. Keep in large container in fridge while you continue with the rest of the dough.
Preheat oven to 375°. Line 2 baking sheets with parchment paper (or silicone mat). Let dough sit at room temperature 15 minutes to temper.
Remove 6-8 rounds from bunch, keeping plastic divider underneath to make it easier to fold, and arrange on a baking pan. Place 2 Tbsp. filling in the center of each round. Top with 2 olive halves (optional). Brush water around half of outer edge of each round. Using plastic divider to help you, fold round over filling and pinch edges to seal. Using a fork, crimp edges. Remove plastic and transfer empanada to a parchment-lined sheet tray, spacing 1" apart. Repeat with remaining rounds (you’ll get about 12 empanadas on each tray).
Mix egg yolk and milk for egg wash. Brush the top of each empanada with wash. Omit for vegan.
Bake empanadas, rotating tray halfway through, until golden brown and slightly darker around the edges, 25–35 minutes.
Serve with fresh squeezed lemon and Cholula, if you like hot sauce 🙂
Do Ahead: Filling can be made 3 days ahead. Keep chilled. Unbaked empanadas can be made 3 months ahead; freeze on sheet tray, then transfer to freezer bags and keep frozen.
Notes
Do Ahead: Filling can be made 3 days ahead. Keep chilled. Unbaked empanadas can be made 3 months ahead; freeze on sheet tray, then transfer to freezer bags and keep frozen.
It's taken me years to find a good flakey pastry dough that doesn't have butter, but this one is the winner. Made with dairy-free cream cheese and vegan butter, this dough will definitely become a favorite for all of your pastry dough needs. Savory and sweet option by altering the cream cheese flavor.
Prep Time1 hourhr
Cook Time20 minutesmins
Total Time1 hourhr20 minutesmins
Course: Breakfast
Keyword: pastry, pastry dough
Equipment
stand mixer
Ingredients
1 8ozcontainer Kite Hill cream cheeseplain for sweet dishes, but I love Everything flavor for savory, like empanadas
“You are not supposed to be happy all the time. Life hurts and it’s hard. Not because you’re doing it wrong, but because it hurts for everybody. Don’t avoid the pain. You need it. It’s meant for you. Be still with it, let it come, let it go, let it leave you with the fuel you’ll burn to get your work done on this earth.” -Glennon Doyle
It’s so easy to avoid pain. Turn on the TV, scroll through social media, drink, smoke, eat, over-exercise… we all have our techniques for burying the discomfort, but unfortunately this only works for so long. The symptoms get louder. For me, I went from doctor to doctor trying to balance my anxiety, depression, and IBS, but all they offered were prescriptions, which only covered up the symptoms. They never asked me about my stress…
At the time I was in a toxic marriage with someone 18 years older than me, was trying my best to be a good step-mom to 2 young boys (one on the autism spectrum), and trying to go to college and work at the same time. The symptoms kept getting louder, until I didn’t even want to wake up anymore. I loved them all so much, so why did it hurt so badly?
Everyone I loved on the outside could diagnose the root cause of my issues as being the relationship (and stress that came with it), but I was too wrapped up in my codependency and idea of “loving someone so deeply” that I thought the pain was just a trade-off. That, sprinkled with some emotional manipulation, left me feeling trapped.
But when I finally got underneath the pain through hypnotherapy, I saw that my attachment issues stemmed from my daddy issues (dad moved away after parents split at 11), so until I healed the little girl who felt worthless because dad left, I couldn’t possibly see that my current partner was not in my highest good. I had to learn how to fill myself up, rather than seek external forces for my sense of worth. And once I did, the truth was so glaring that it didn’t take long for me to leave the marriage.
So lovie, what pain are you avoiding? I can tell you from experience that burying it only works for so long, and ends up creating more pain in the long run. If you’re ready to really work on it, a virtual hypnotherapy session is a great place to start. You’re not in this alone. 💛
I wanted to leave you with a tasty recipe for this Labor Day weekend, and I’m super happy with this new creation. I’ve been cooking quite a bit lately, as it’s a wonderful creative outlet for me, and also tends to relieve some stress (especially when I’m creating chocolate treats… ). I definitely don’t condone stress eating, but I do encourage finding healthy replacements for foods that would typically have a much bigger burden on your body. These are a health-coach approved healthy treat, but are honestly so nutritious they could go in the “snack” category 🙂
Lily’s chocolate is one of my all-time favortie brands and they recetly released a white chocolate chip. It does contain a small amount of milk-fat, so replace with dairy-free choclate chips if strictly vegan/paleo. I tolerate these fine so I use them for treats like these, but they can easily be replaced.
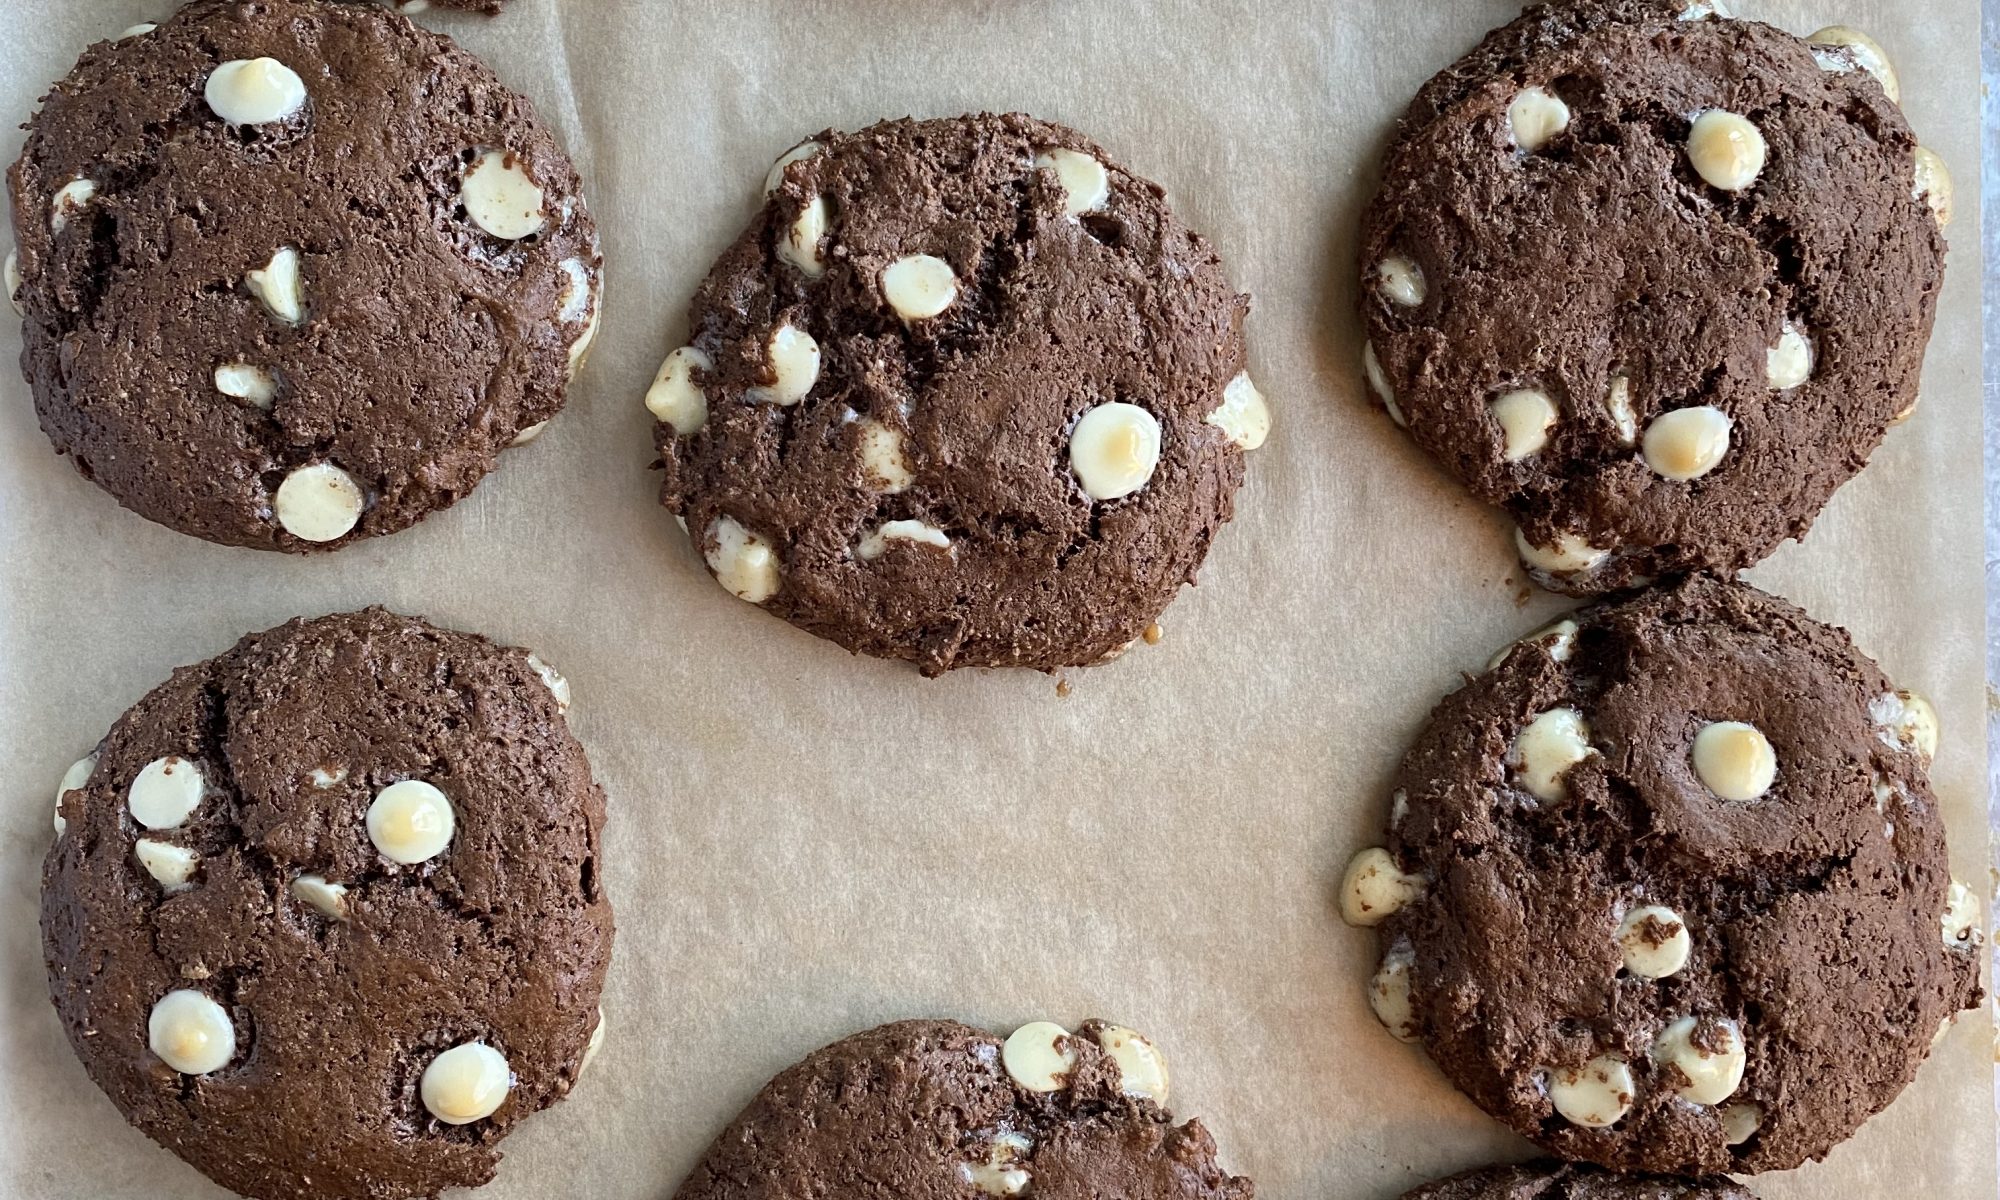
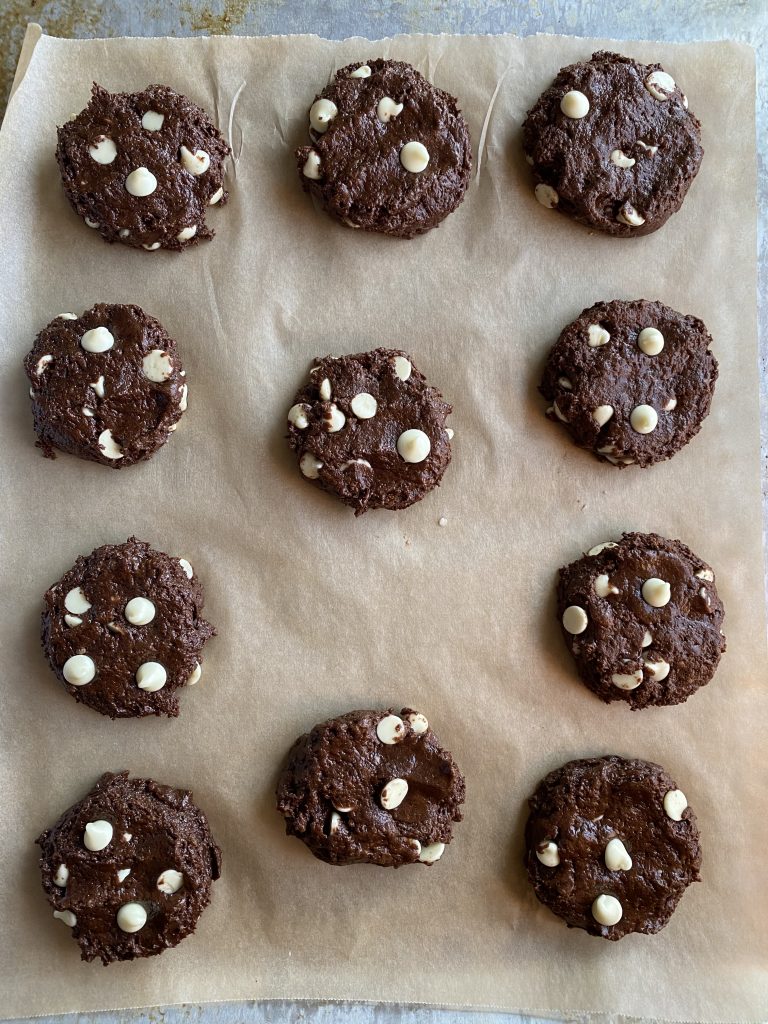
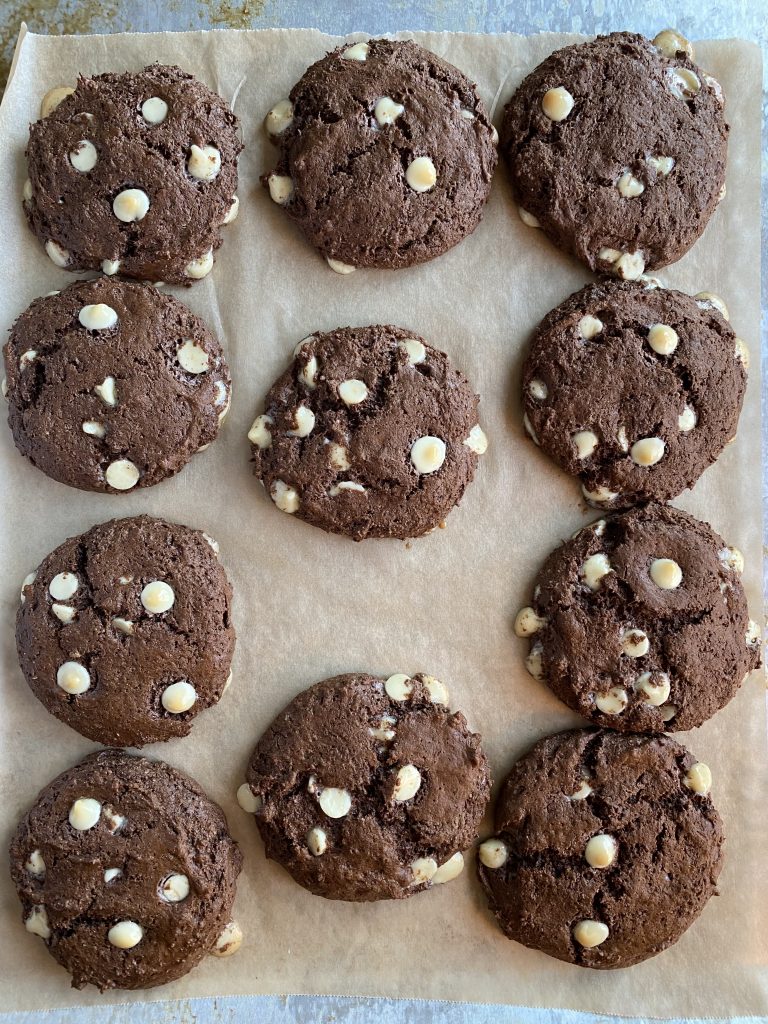
Chocolate White Chocolate Chip Cookies (high-protein, paleo, gluten-free, vegan)
I'm so excited to have recreated a high-protein and clean version of those store-bought chocolate white choclate chip cookies I used to salivate for. Now we can all enjoy them without the toxins! They could even pass as a healthy snack, not just dessert.
Prep Time15 minutesmins
Cook Time10 minutesmins
Total Time30 minutesmins
Course: Dessert, Snack
Equipment
stand mixer
Ingredients
1/2cupplant based protein powder
1/2cupcollagen
1/2cupcocoa
1/2tspbaking soda
1/2tspsea salt
1/3cupcoconut sugar
1/2cupalmond butter
2flax eggssee instructions (or regular eggs)
1tspvanilla
1cup@Lily’s white chocolate chips(they have small amount of milk fat so use another kind if strict vegan or paleo)
Instructions
Make the flax egg by combining 2.5 tbsp water with 1 tbsp ground flax seed. Place in fridge for 10 minutes – they should be gelatinous.
Preheat oven to 350 F and line a baking sheet with parchment paper.
In a stand mixer or mixing bowl, cream together the wet ingredients on high until smooth.
In a separate bowl, whisk the dry ingredients together. Slowly add to the wet ingredients, stirring as you go until well combined. Stir in the white chocolate chips.
Scoop the dough into 10-12 balls and press down slightly. Top with a few chips. Bake for 10-12 minutes.
Cool on pan for 10 minutes, then carefully slide parchment paper onto wire rack and cool completely.
Store in airtight container on counter for 4 days.
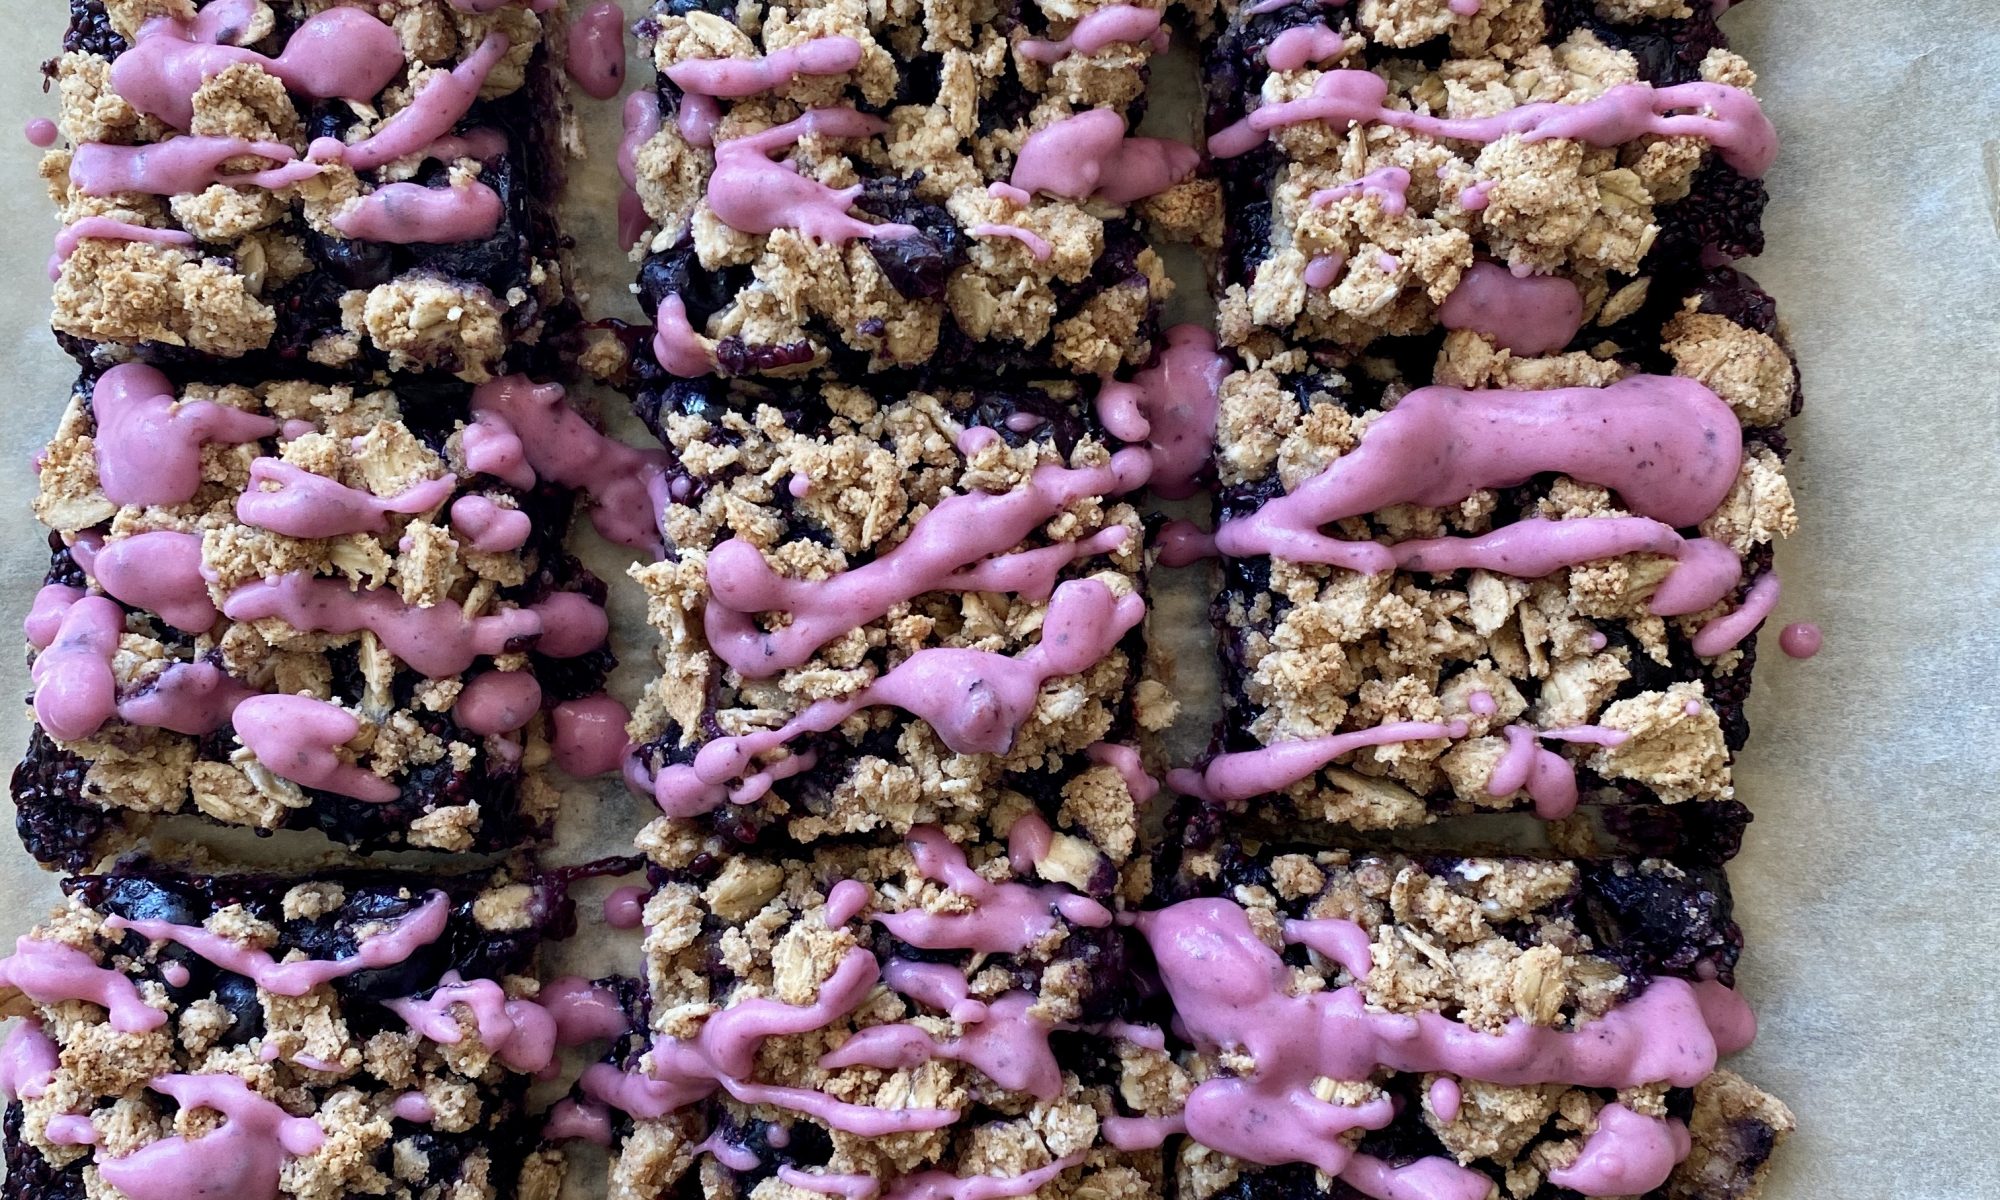
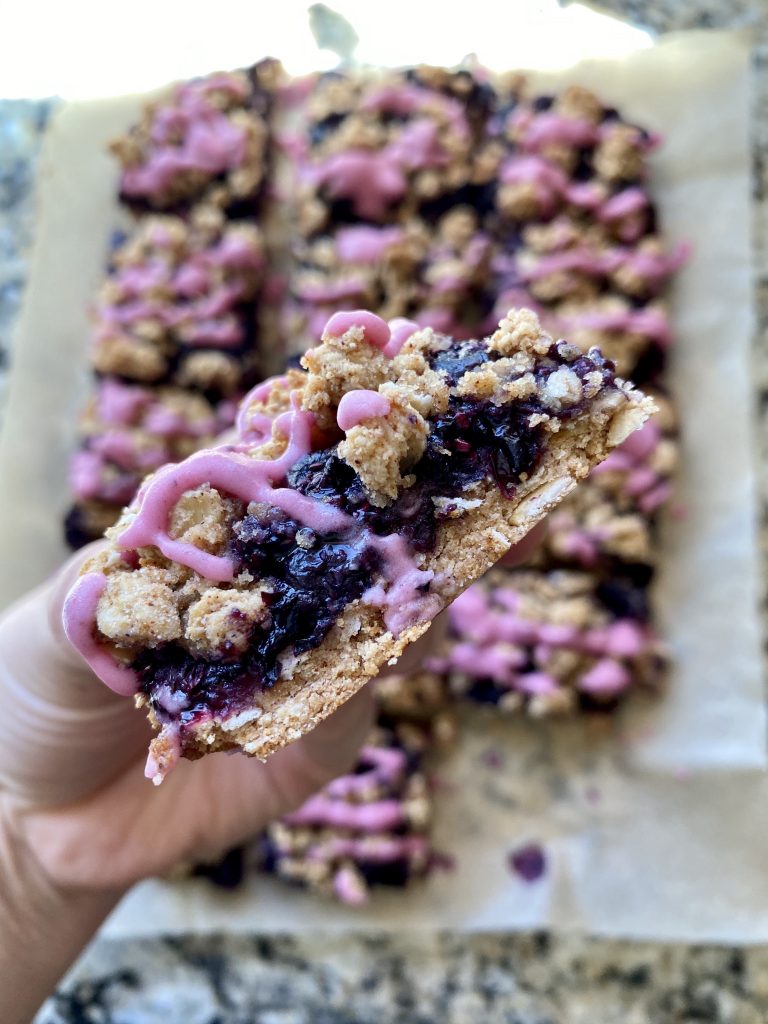
Okay guys… this creation has me RULL excited. It’s free of toxic ingredients and is super easy to make. I made it with blueberries but you can switch in any berry of choice!
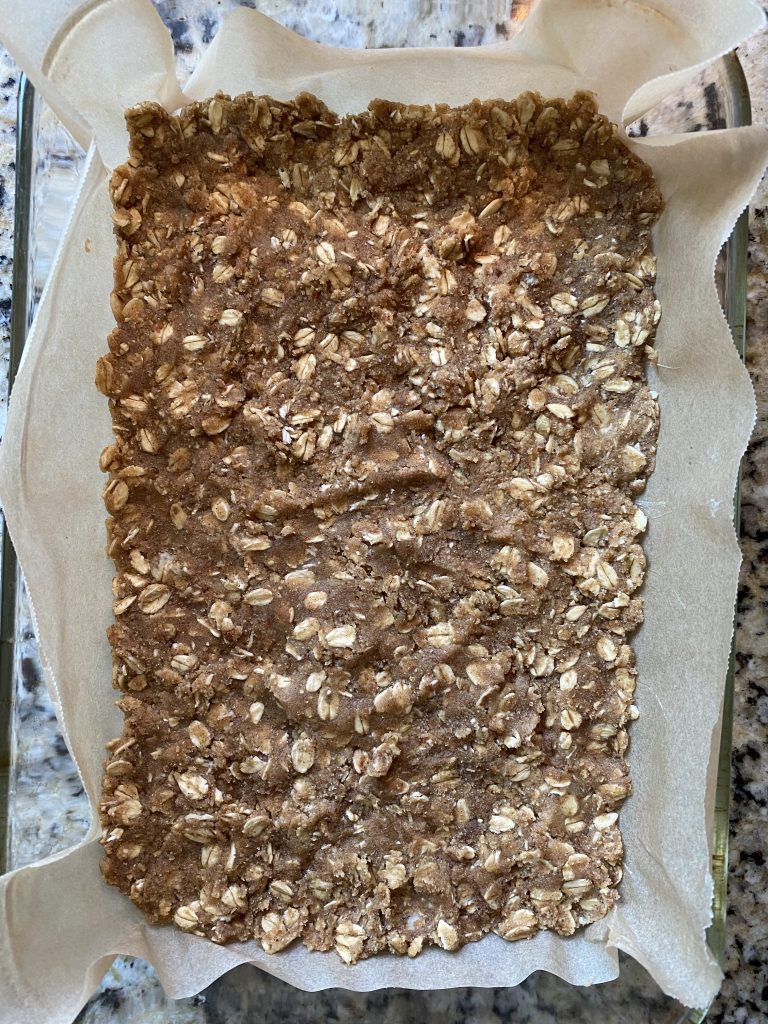
Preheat oven to 350 and line an 8×8 baking dish with parchment paper
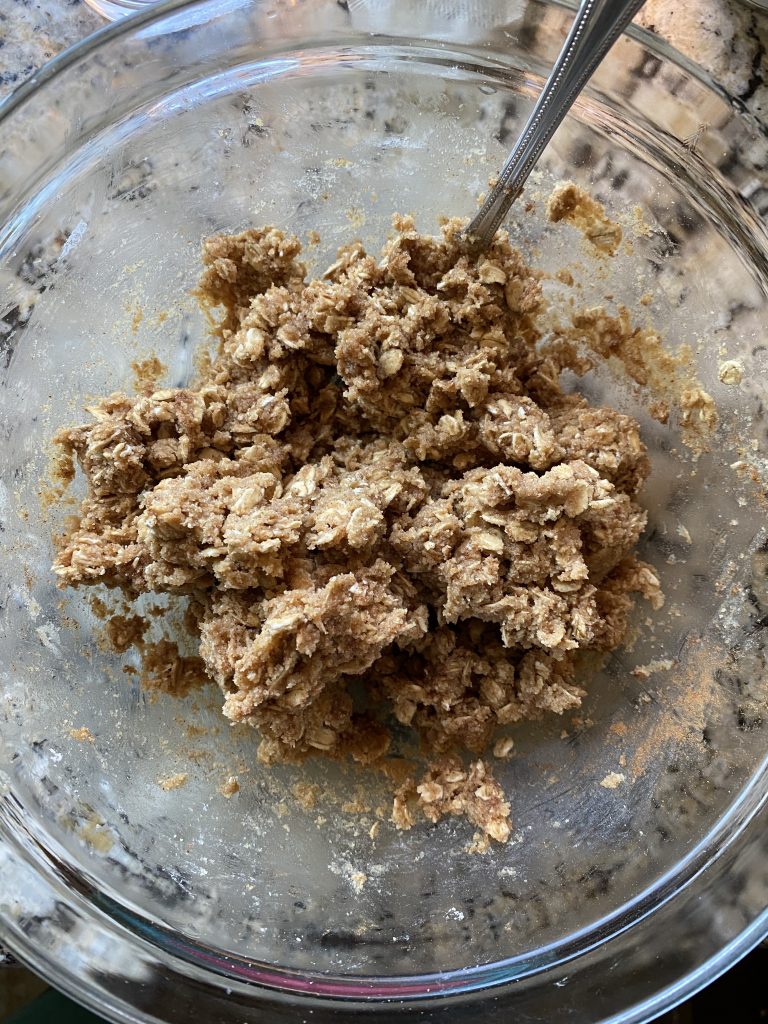
Combine the cookie layer in a bowl until well combined.
Press a little over half of the mixture into the baking pan and bake for 15 minutes.
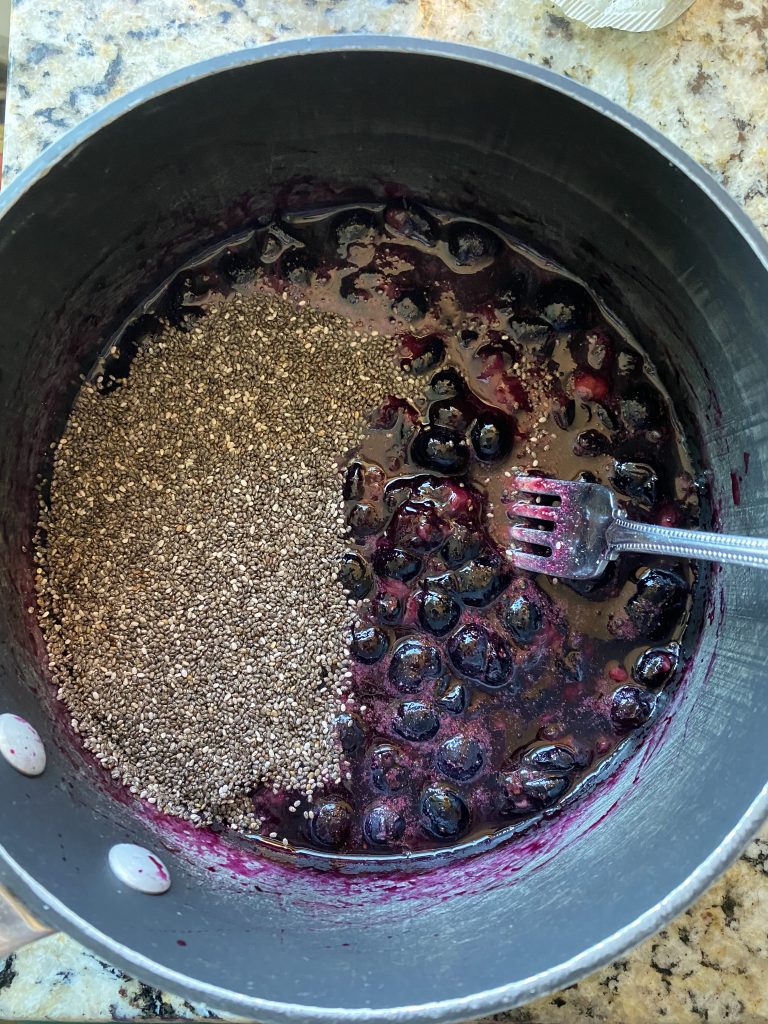
Meanwhile, make the berry layer by placing the berries, lemon juice, and maple syrup in a small saucepan over medium-high heat. Crush the berries with a spoon until mushy. Remove from heat and stir the chia seeds and vanilla in.
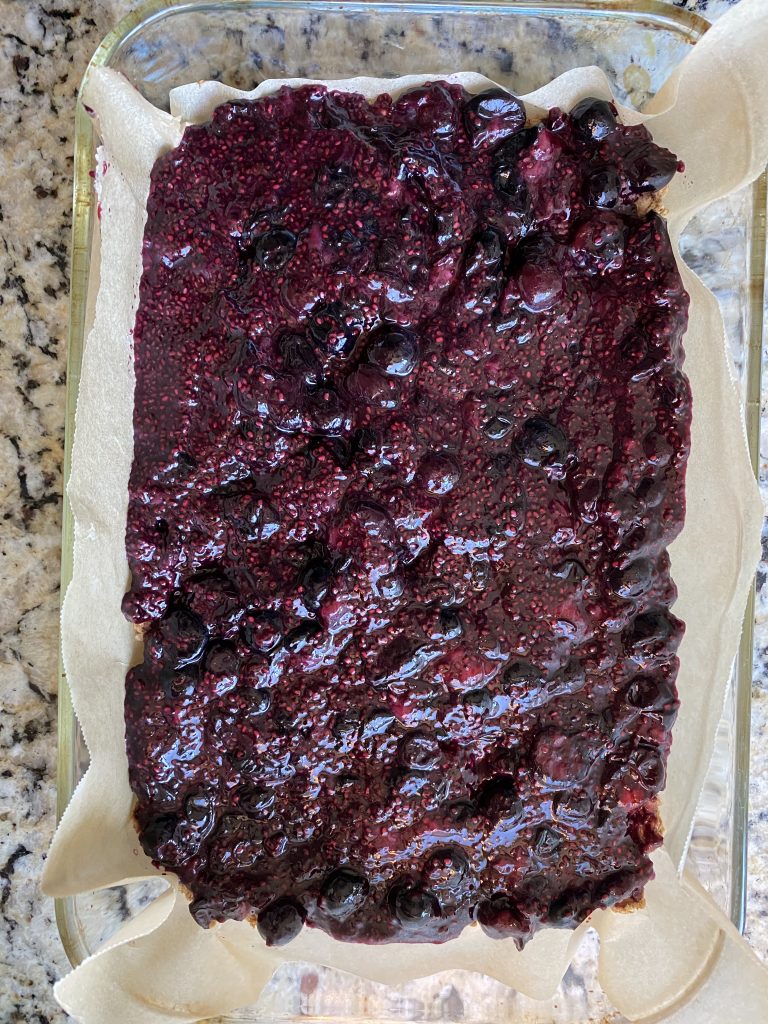
When the cookie layer is done, spread the blueberry mixture evenly, then top with the remaining cookie mixture crumbles.
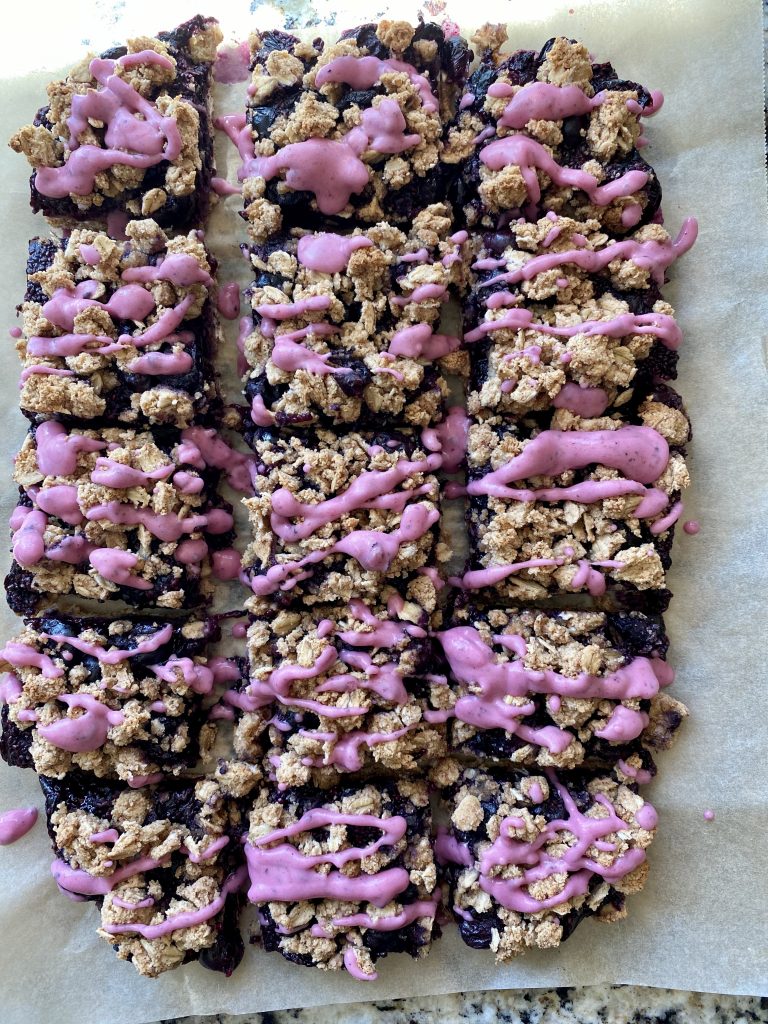
Bake for 20-25 minutes, or until golden brown. Cool on a wire rack.
While the bars are cooling, make the drizzle by blending the wet ingredients (starting with 1 tbsp water) in a blender, adding more water if necessary (you want to be able to drizzle it.)
Once cool, cut into bars and then drizzle the blueberry mixture over the top with a spoon.
Store in an airtight container on counter or fridge for 4-5 days.
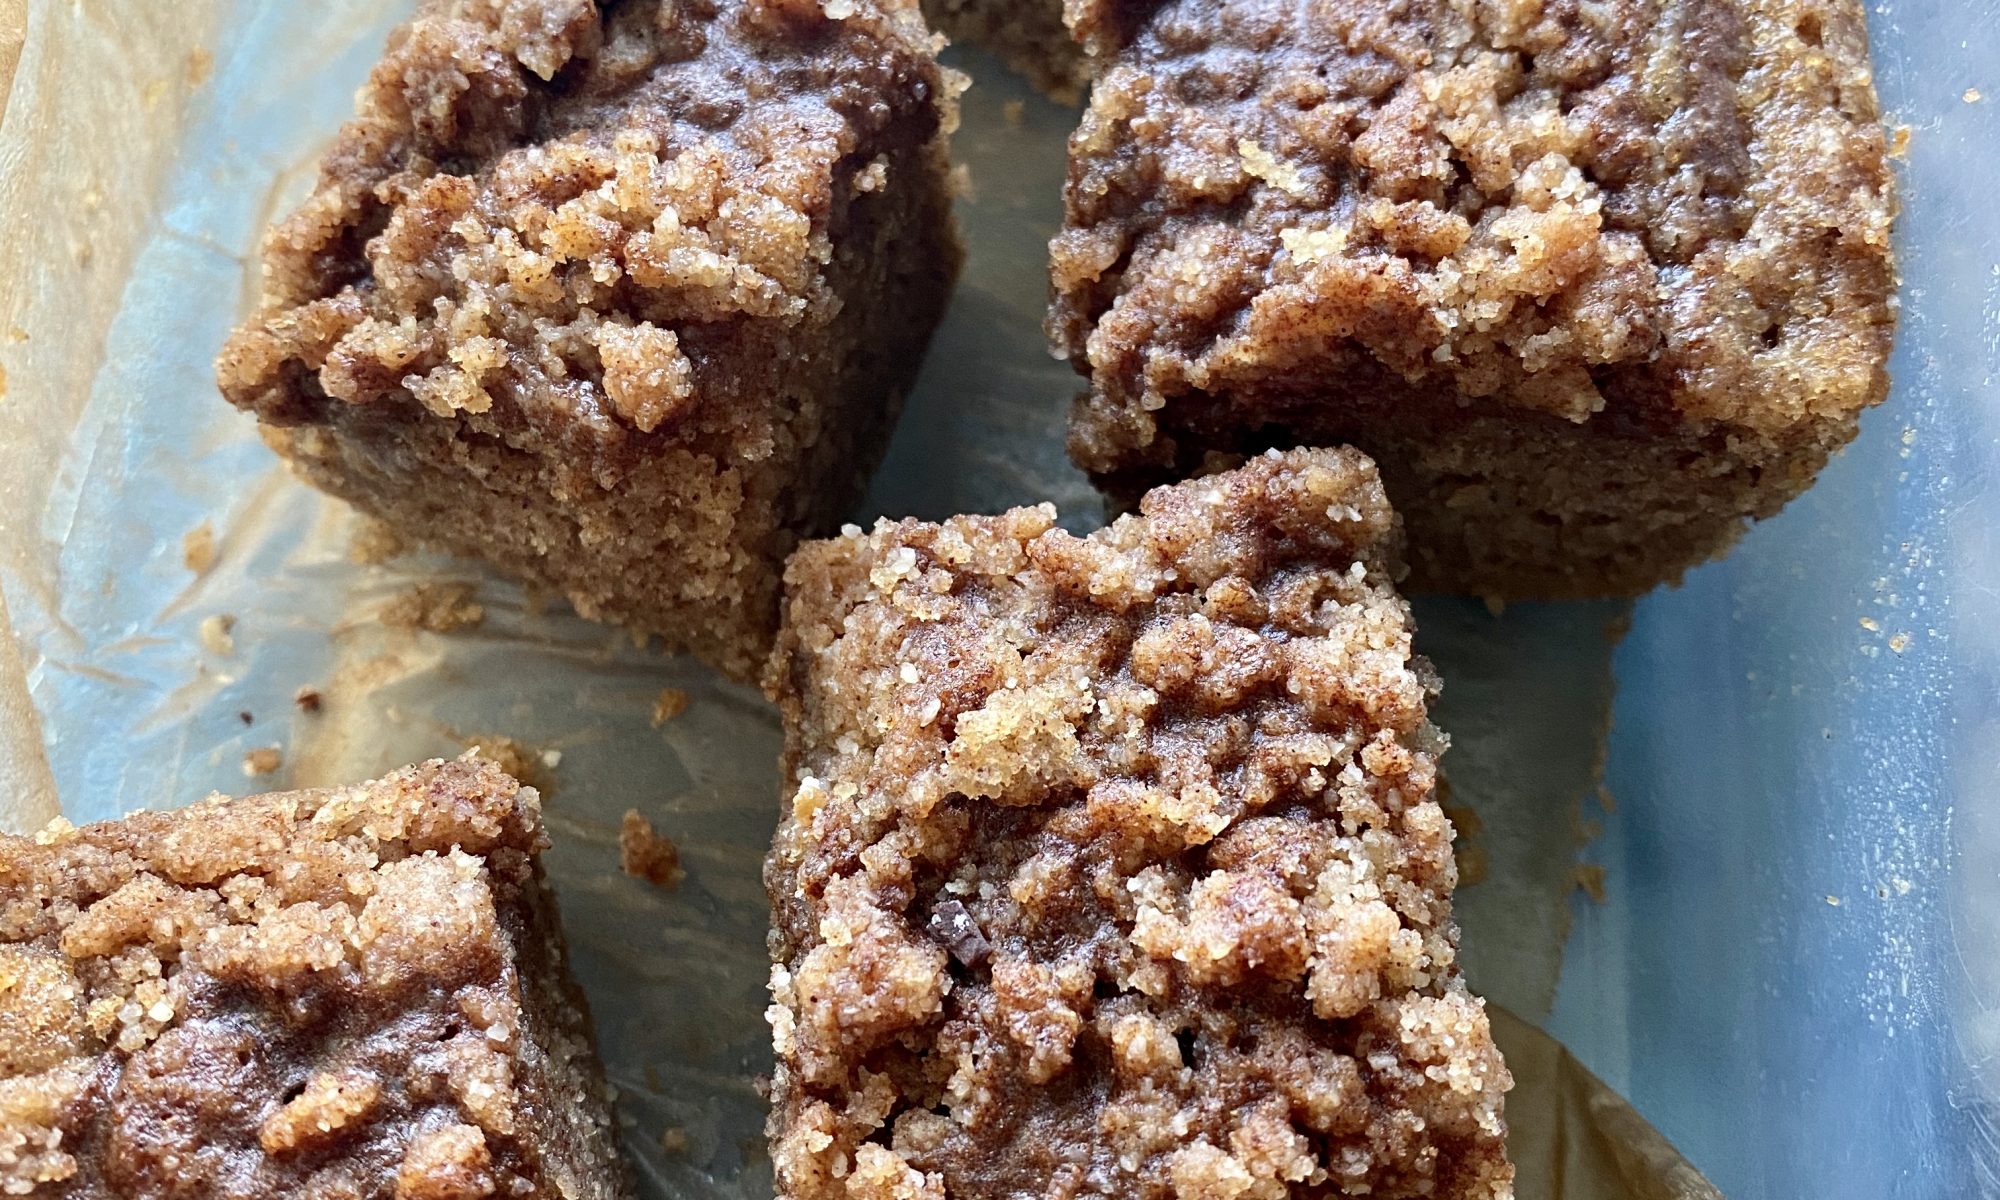
1/4cupgheecoconut oil, or grass-fed butter, cold and cut into bits
Coffee cake:
1 1/2cupalmond or oat flour
1/2cuparrowroot flour
3tbspcoconut flour
1/3cupcoconut, maple, or monk fruit sugar
2tspcinnamon
1/2tspbaking soda
1/4tspsea salt
3eggs at room temp
1/4cupnon-dairy milkfull-fat canned coconut is ideal
1tbsplemon juice
1tspvanilla extract
3tbspcoconut oilghee, or grass-fed butter, softened
Glaze:
1/2cupmonk fruit powdered sugar
1/2tspcinnamon
1tbspnon-dairy milkfull-fat coconut milk ideal
Instructions
Preheat oven to 350 F and line an 8×8 baking pan with parchment paper (grease any exposed sides)
In a small bowl, combine the crumb topping ingredients until broken into small clumps (I use a fork, or you could be official and use a pastry cutter). Place in fridge until ready to use.
In the bowl of a stand mixer, cream together the coconut oil and sugar until creamy. Add the eggs, one at a time, mixing in-between. Add the remaining wet ingredients and blend until smooth.
In a medium bowl, whisk together the dry ingredients. Slowly add them to the wet ingredients and mix until smooth.
Pour the mix into the prepared baking pan, then top with the crumb topping, distributing evenly.
Bake for 30-35 minutes, or until a toothpick comes out clean, or with just a few moist crumbs.
Cool on a wire rack. While waiting prepare the glaze. Once cool, drizzle the glaze over the cake and enjoy!
Stores best in airtight container in the fridge. Stays fresh for 4 days.
This week I had several first time hypnotherapy clients. Most people have some talk therapy under their belts by the time they try a modality like hypnotherapy, and this was true for each of my new clients.
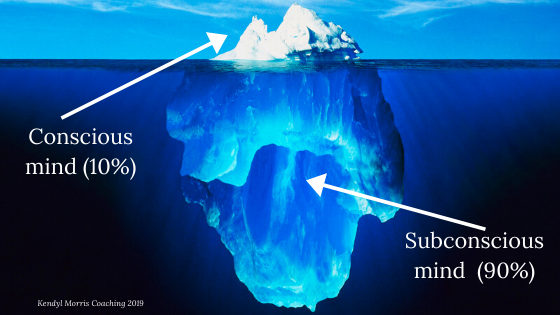
The biggest difference between talk therapy modalities and hypnotherapy is that talk therapy operates in the conscious mind, while hypnotherapy operates in the subconscious mind. Your conscious mind only makes up 10% of your mind, while the remaining 90% is subconscious (the iceberg below the water’s surface). This is one of the main reasons why most people aren’t able to experience the relief they desire from talk therapy. The root cause of the presenting issue (anxiety, depression, eating disorder, addiction, etc) is in the subconscious mind, so it’s no wonder why your patterns take a long time to change (if at all) when only doing a modality like talk therapy that only remains in the 10% conscious mind. This is not to suggest that talk therapy doesn’t have value, but when it’s the egoic mind that is talking, it’s difficult to get very far at the pace most of us desire.
I tried talk therapy for years as a teen and young adult, seeking a non-medication treatment to my chronic anxiety and depression. I would often feel some sense of calm in the therapist’s office, but then I would leave and my mind would slip right back into its patterns. This is because nothing truly changed in my mind…yet.
I finally dove into hypnotherapy when I was at my wit’s end and willing to try any tool that might work. I had heard good things about this modality from my parents for years but was too afraid (who had been on hypnotherapy retreats and experienced significant growth) but was so miserable that I finally gave it a try.
This single session was more informative than the years of talk therapy I had been through. I experienced how the hypnosis was simply a tool for relaxation, not something for the therapist to exert control (high-school graduation stage hypnosis was my only context). It allows the conscious mind (ego) to relax enough so that we can access the root cause in the subconscious. Think of it like software in a computer – everything you’ve experienced is stored in your subconscious mind, whether you remember it or not. This is why many people are afraid. They worry about retraumatizing themselves with memories that they don’t consciously remember. I know now that this doesn’t happen. Your mind has built up so many defenses that it won’t even let you go there if you aren’t ready (at least in this setting). The point of having a trained therapist there with you is to create a container of safety so that the walls can come down, at your pace, and we can shine light on the old, abandoned parts of your psyche that are driving the suffering you are likely experiencing today (the anxiety, chronic stress, self-consciousness, etc). The exciting thing is that just like software of a computer, we can reprogram or rewire the underlying belief systems that were created in those traumatic moments early on.
Here’s an example of how it works:
I have a client who has been a chiropractor for 24 years and came to me to work on her inner self-saboteur. She said that since Covid hit her adult children are home and she’s finding how she’s constantly putting everyone’s needs before her own, which means she misses workouts and doesn’t eat the way she wants to. Sound familiar?
The session begins with getting in touch with the intention and the current experience of the presenting issue. Ie. I wake up nauseated with anxiety, I have super low self-esteem and am constantly judging myself, or in this case, I don’t exercise enough and feel shame in my gut and tightness in my chest.
Once that’s clear we then begin the hypnosis portion of the session where I walk you through a visualization exercise that takes you into a deep state of relaxation. Once you’re there we then bring in resources. This is part of that container I was talking about. We build that with YOUR resources. We’ll anchor into your nervous system the experience of a safe/favorite place (through more guided visualization) – this will then be a tool you can use inside and outside of the session to relax (to bring you out of fight or flight mode into a parasympathetic state).
We will also connect with any spiritual connection you might have, or if this is new, work on nurturing that relationship with any spiritual connection you have but haven’t spent much time with (the Universe, love, nature, God, etc). This is what you connect to in prayer, meditation, or even walking in nature and is an incredibly powerful way to ground yourself daily – something I like to refer to as spiritual hygiene.
The last resource we connect to is your higher self – that wise adult that lives within all of us and makes healthy choices for us as we walk down our life path (one that we don’t tune into enough!). They’re the one who speaks through intuition, or that gut feeling. The one who we have access to always, but we first must learn to quiet the noise of our conscious mind (ie. Spiritual hygiene!) We’ll make sure you feel connected to that higher self before we do any deeper work.
Once you have your resources gathered, then we bring up the emotional experience you want to work on. In the example of my chiropractor client, we brought her back to the most recent time she had that strong sense of her self-saboteur. It was earlier that week when she chose to make hotdogs and burgers for her boys instead of a plant-based meal she was craving. We begin to tune into the body and the experience it has (because usually we’re so stuck in the head we miss vital information). She could feel loneliness inside, and a sense of shame in her lower half.
This is when I guide you in an age regression, back to one of the earliest moments in your life when you had a similar experience of emotion and physical experience. My client went back to being 7 to the first time her uncle molested her. Now, to be clear, this is not re-experiencing the trauma, it’s going back to gather information and diffuse any of the suppressed emotion that’s made it so it feels unsafe to be in your body. My client knew she was safe, but was able to connect with the inner 7 year old who created some core belief system during this memory, which is the information we’re looking for. She felt a numbness all over her body (which is dissociation, something most people learn as a result of abuse) and an inability to think clearly. This is a state of shock that we can clear in session, and needs to happen before the healing can happen. The way we did it in this session was by disconnecting her uncle’s toxic energy from her 7 year old, and then bringing in any parts of herself that she felt had been lost her. Some cultures call this soul retrieval. With the help of her spiritual connection (which in this case was Archangel Michael), and my reiki/subtle energy training, we were able to cut the energetic cord connecting her to her uncle. She began to feel more in her body when this happened as the shock began to clear. She then saw that her innocence and joy had been lost in this terrible situation. But because we’re working with energy here, we were able to bring those parts back. She visualized the soul pieces as a sunshiney yellow light coming back into her chest and gut, and I could visibly see a difference (even though Zoom!) as she brightened up. This is my favorite moment of every session. When I can witness this level of transformation in less than 75 minutes, I can’t help but feel like anything is possible.
Once she had her joy and innocence back in her body, we were able to tune into the belief she took away from this situation, and then resulting decision about how to behave. This is the gold that we hope to get from sessions, because this is the wiring that is the driving force behind the current suffering.
Her 7-yr old self had concluded that she wasn’t important and had to put others first. And because of this that she wouldn’t use her voice or take care of herself fully. I mean, WOW. How many women have this core belief system? I know I’ve had to change it in session!
With her tuned fully into her higher self, spiritual connection, and little girl, she then changed the belief to: I’m important, will love myself and put myself first. In the subconscious state you’re in during hypnotherapy, this new belief system becomes a new neural pathway (ie. Software!) and the more you reaffirm it out of session (during your spiritual hygiene) the stronger that belief systems become, and therefore, the smaller the struggle becomes.
This client was so grateful and said she had never experienced anything like what we did. I hear this from almost everyone. When they say it with brightness in their eyes that wasn’t there before, I know we’re doing big work.
There is collective trauma going on right now compounded onto your normal human trauma (that we all have to different degrees). It seems more important than ever to start working on the shadows that keep us in perpetual states of fight or flight, doesn’t it? Doesn’t this seem like an opportunity to do something amazing in our communities and world? The divisiveness we witness and feel socially is simply a symptom of the inner disconnection and division we have with ourselves. It seems that the only way to truly heal this problem, we need to heal the root cause – our own pain. And to do that you need support. We all need help. Why not use this time to be intentional with your personal experience, rather than continue to suffer and complain about the lack of control you feel socially?
If you’re interested in hypnotherapy you can read more here, or if you’re ready to jump into your personal-growth book a session here.
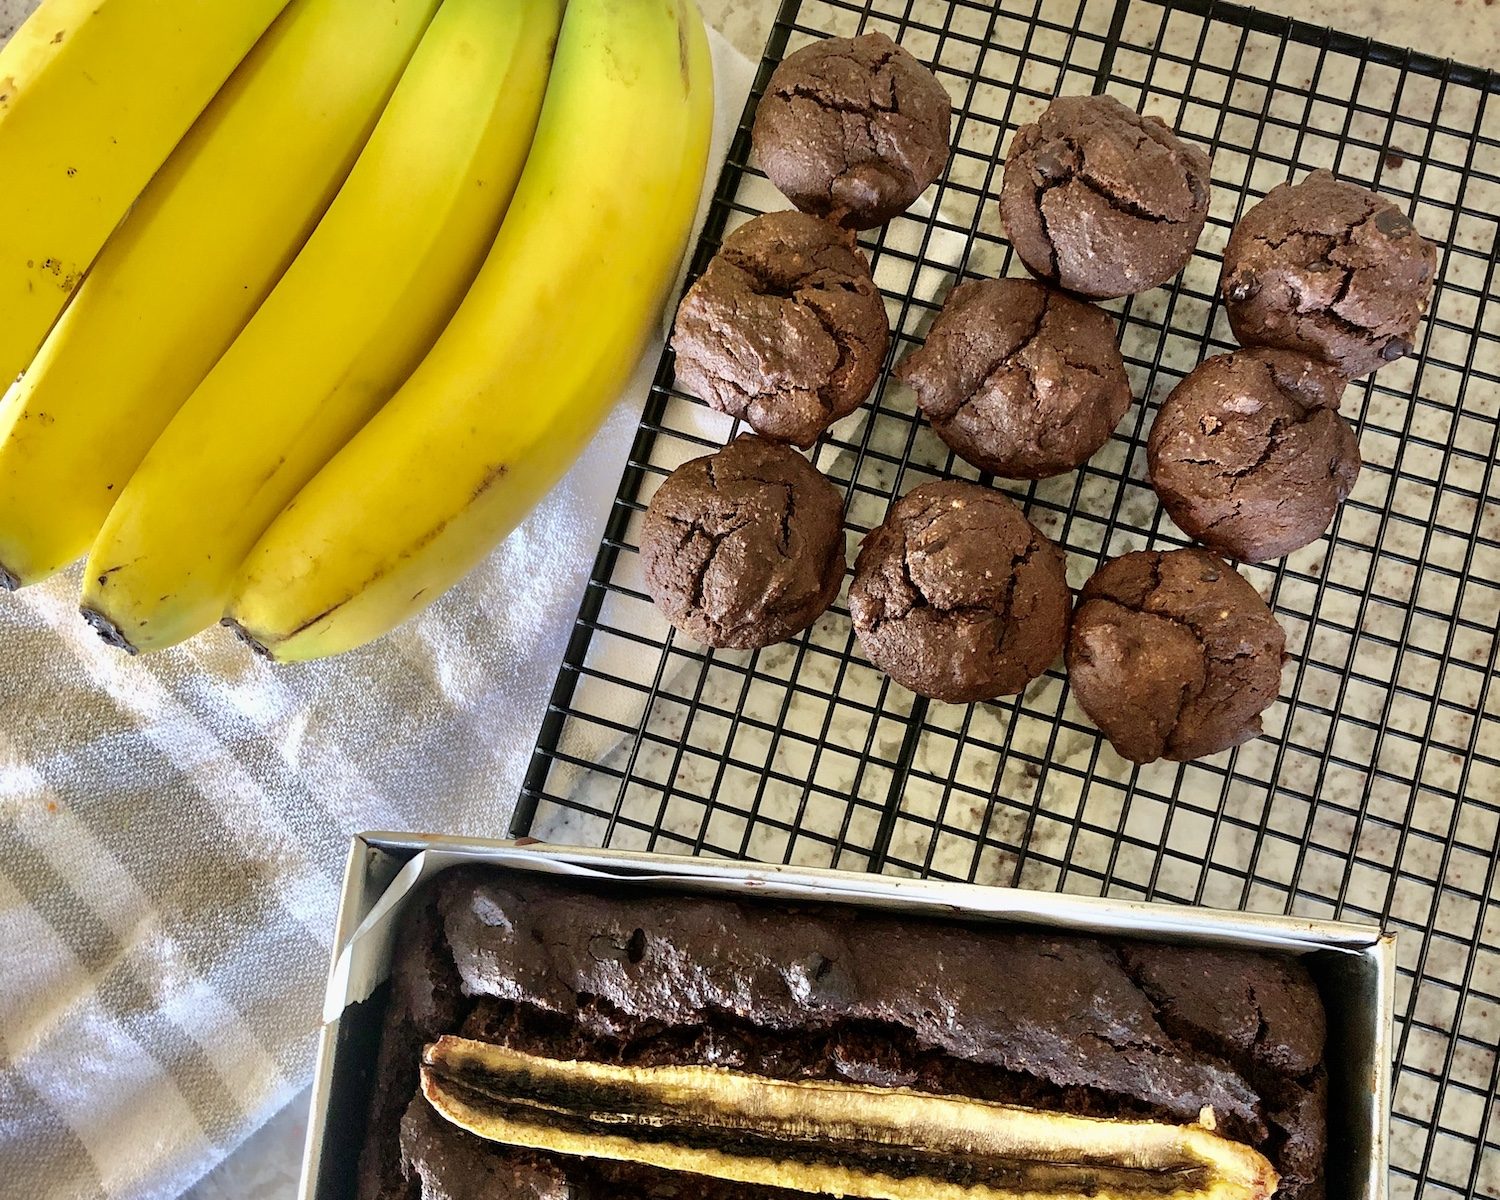
I love making different versions of banana bread, but I think this one just might be my favorite. Pro tip: It tastes like brownie bites in a mini muffin mold. You could also add a chocolate glaze to a doughnut version (or any version, no rules about chocolate here!)
Prep Time20 minutesmins
Total Time1 hourhr10 minutesmins
Course: Breakfast, Dessert, Snack
Keyword: banana bread
Servings: 10
Equipment
Stand mixer or large mixing bowl
bread pan or silicone mold of choice
Ingredients
4tbspground flax for flax eggsor large organic pasture-raised eggs
1/3cupgolden monk fruit or coconut sugar(I do a half and half combo)
2tspvanilla extract
1/4cupmelted coconut oilor grass-fed butter, or ghee
Preheat oven to 350 degrees. Line a 8X4 bread pan with parchment paper and spray, or spray any silicone mold you’re using.
Make flax eggs by combining 1 tbsp ground flax with 2.5 tbsp water for each egg. Let sit 10-15 minutes in fridge, or until gelatinous. If starting with whole flaxseed put in coffee grinder or high-speed blender and process until ground.
Melt the coconut oil and let it cool for about 5 minutes.
In a stand up mixer or large bowl, add the banana, (flax) eggs, oil, coconut sugar, and vanilla. Beat on low or mix until well combined.
In a medium bowl combine all of the dry ingredients.
Slowly add the dry ingredients to the wet ones in the mixer and combine on low-medium until a batter has formed and there are no clumps.
Divide the batter into the pan- will fill each one about 2/3 full.
Bake for 21-24 minutes, or until a knife comes out clean from the center.
Cool on wire rack until ready to gobble up (They release better from pans after almost cooled completely). Delicious with raw honey, peanut butter (obviously), or any other nut butter, ghee, jam, a sentimental movie and a good snuggle… basically anything.
Notes
Can make into any pan or silicone mold – muffin (bake 16-20 minutes), doughnut pan (line with parchment paper and bake for 40-50 min), or mini muffin (12-15 min).
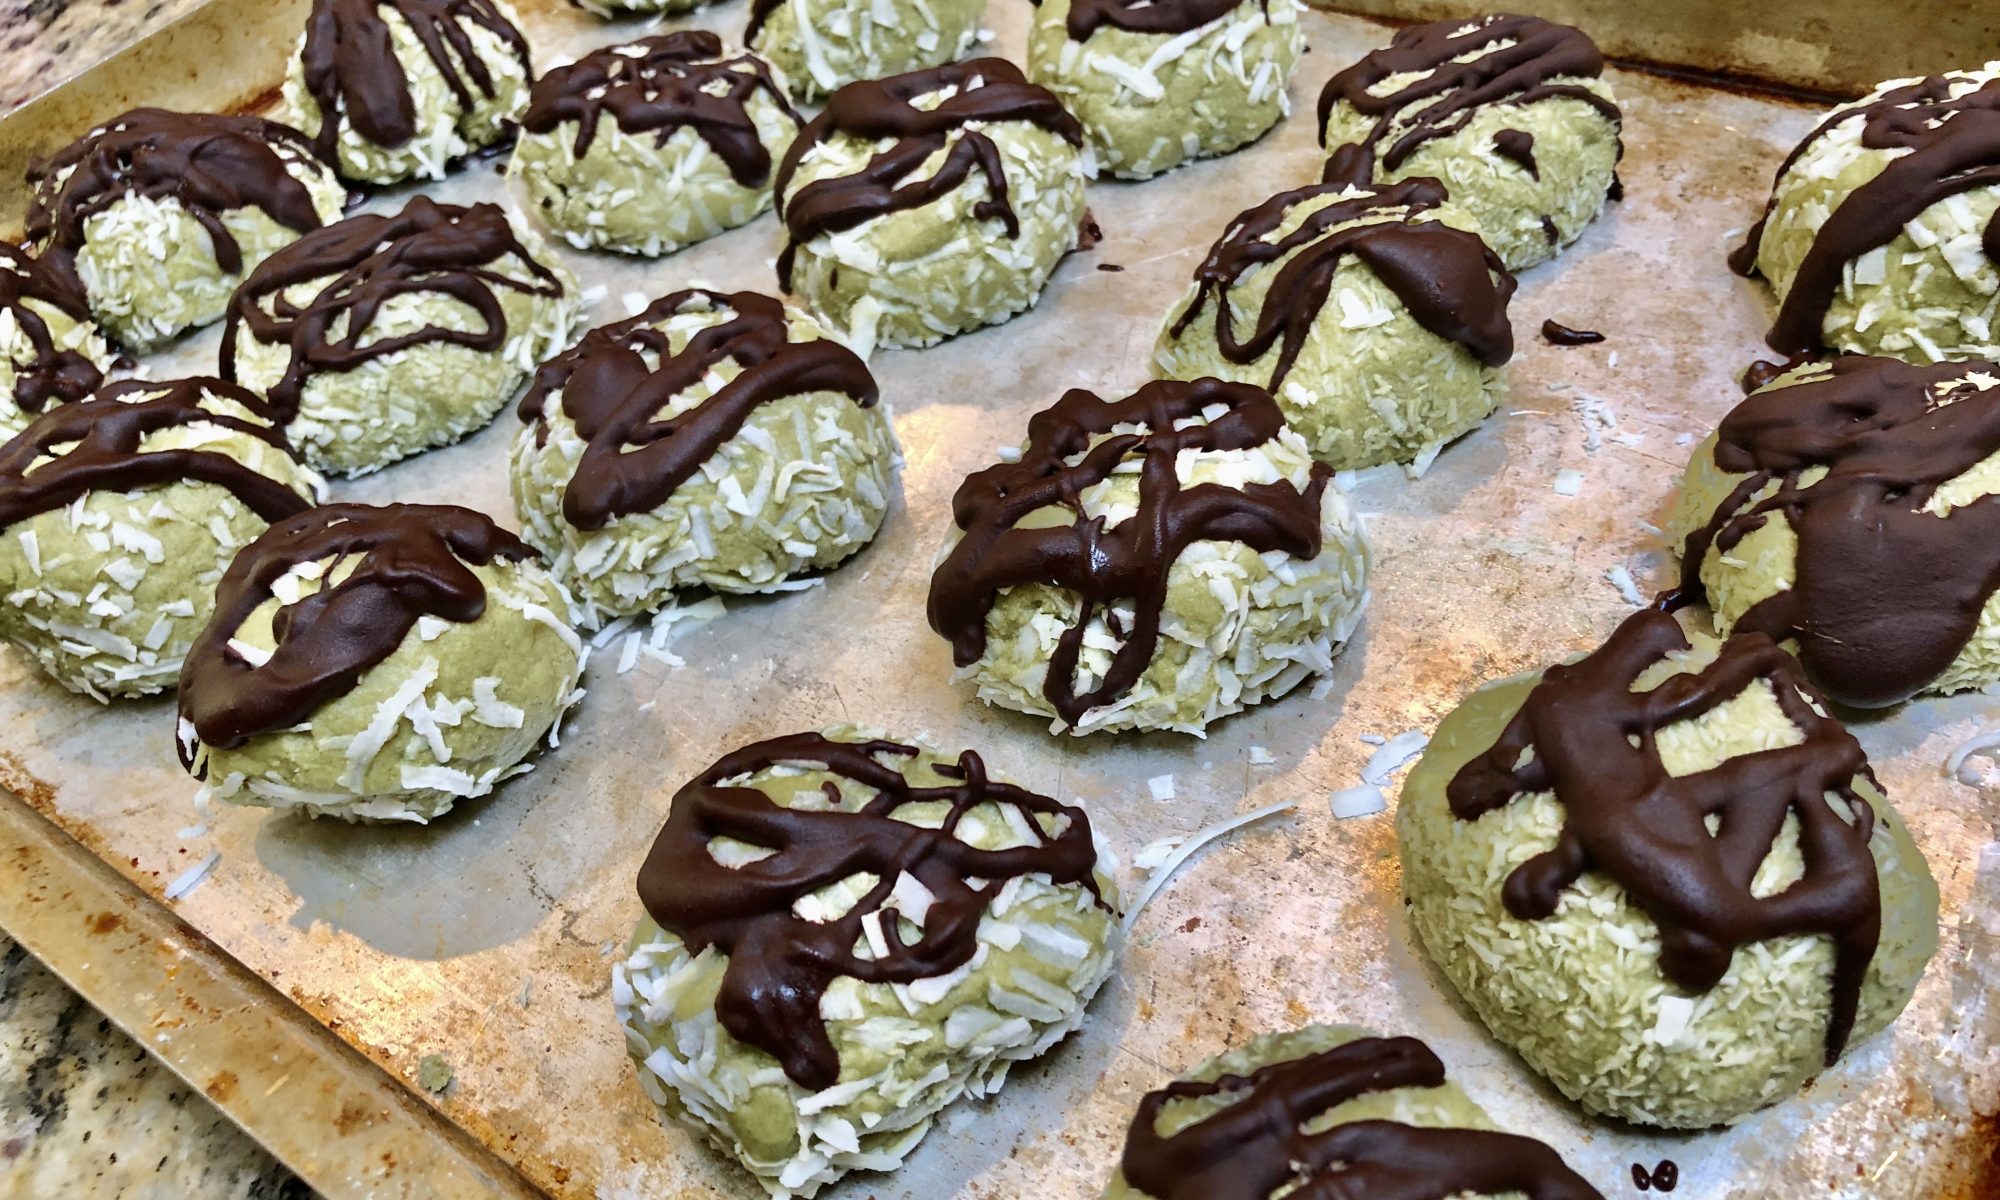
I love a good power bite, especially these energizing green balls of wonder. The fresh mint makes them especially refreshing, especially with these hot days. Pop them in a iced cooler for an outdoor day and you won't be sorry!
Prep Time30 minutesmins
Cook Time1 hourhr
Total Time1 hourhr30 minutesmins
Servings: 24
Equipment
Food Processor
Ingredients
1cupraw, organic tahini
1cupcoconut manna
1cuporganic plant-based protein
1cupcollagen
2cups+ 1 cup shredded coconut
¼cup+ ¼ cup monk-fruit confectioners sugar
10-15fresh organic mint leaves
3-10dropsorganic peppermint essential oilstart tasting after adding 3 drops and adjust to preference
2tbspmatcha powder
1tbspmaca powderoptional
1chocolate Lily’s chocolate bar or 1 cup Lily’s chocolate chipscan use any chocolate of choice, optional
1tbspMCT oil or melted coconut oil
Instructions
Melt the chocolate on the stove at low heat. Stir frequently until completely melted. Set aside.
Place 1 cup of the shredded coconut in a bowl and set aside.
Mix ingredients (except for monk fruit confectioners, and 1 tbsp MCT oil) in a food processor. Stop to scrape down the sides if needed. Add more protein powder if it’s not solid enough to roll into balls (they’ll be slightly squishy but you don’t want them to melt in your hand or flatten when set down.
Roll dough into 1 inch balls and then coat in the 1 cup shredded coconut. Place on cookie sheet. Will make 18-24 bites.
Stir ¼ cup confectioners and 1 tbsp MCT oil into the melted chocolate until well combined.
Drizzle or coat the bites with chocolate.
Place in the freezer for 10 minutes (until hard) and then transfer to the container.
Store in fridge for a week and in the freezer for 6 months.
Notes
notes: I always double or triple the batch and freeze them to have on hand for a quick boost. You can even eat them straight from the freezer.Other flavor options:Pure Matcha Omit mint and/or chocolateLavender Matcha Replace fresh mint with dried lavender flowers and mint essential oil with lavender oilLemon lavender Replace fresh mint with dried lavender flowers and mint essential oil with lavender oil. Add 1 tbsp fresh lemon zest, 5-10 drops lemon essential oil or 1 tbsp lemon juice and omit matcha.Make it your own Add any of your favorite superfoods, dried fruit, seeds, nuts, or flavor additions that you enjoy – the combinations are endless!