Flakey Empanadas (vegan, gf, df, non-vegan option)

See below for pastry-dough recipe

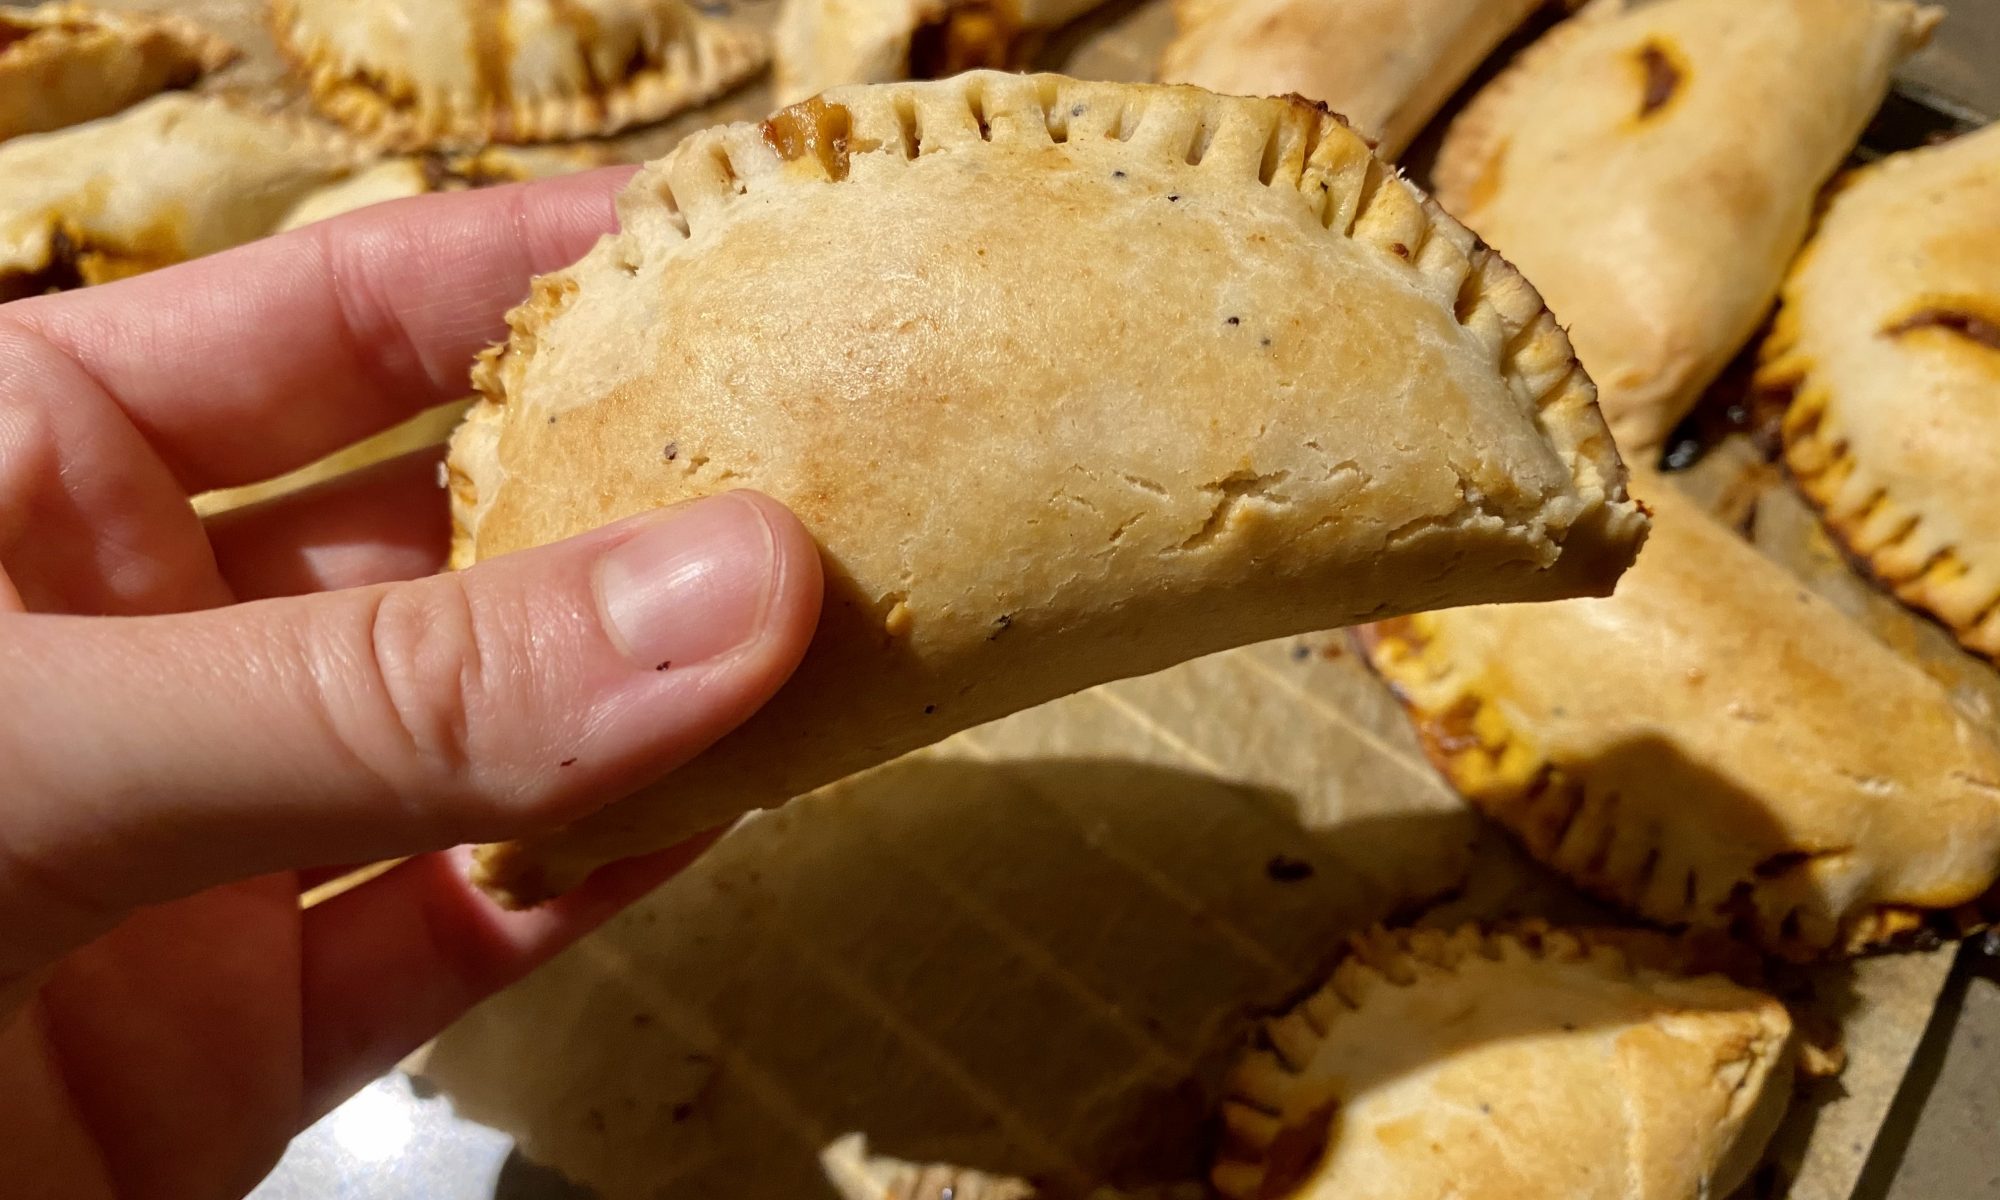
Empanadas (df, gf, vegan, non-vegan option)

My partner is from Argentina and every time we visit I love sampling the different varieties of empanadas, a traditional Argentine favorite. They even have gluten-free bakeries that sell them as gluten-intolerance has started rearing it's ugly head in South America. I have to say, this recipe takes the cake for my favorite homemade gluten-free empanada, and I even make them with Beyond Beef so they're completely plant-based. I hope you enjoy them as much as we do!
Prep Time45 minutes
Cook Time3 hours
Total Time3 hours 45 minutes
Course: Main Course, Snack
Cuisine: Argentine
Keyword: empanada

Equipment

  • Rolling Pin
  • parchment paper

Ingredients

  • 3 Tbsp. extra-virgin olive oil or avocado oil divided
  • 1 lb. ground Beyond Beef – or bison / grass-fed ground beef for non-vegan
  • 1 large onion chopped
  • 2 small red bell peppers seeded, chopped
  • 1 tbsp minced garlic
  • Sea salt freshly ground pepper
  • 3 Tbsp. ground cumin
  • 2 Tbsp. sweet paprika
  • 1.5 Tbsp. dried oregano
  • ¼ tsp. cayenne pepper
  • 3 tbsp tomato paste + 1/2 cup water or 1/2 cup tomato sauce
  • 1 cup veggie stock or broth
  • 2 tsp coconut sugar
  • 1/2 cup cilantro chopped
  • 1 cup frozen peas / corn
  • Optional- 1/2 cup chopped banana peppers
  • 1 batch gluten-free pastry dough, chilled for 1 hour
  • For traditional Argentine-style: ½ cup pitted green olives Picholine or Spanish, rinsed well, cut in half lengthwise
  • 1 egg yolk + 1 tbsp non-dairy milk for egg wash omit for vegan

Instructions

  • Heat 2 Tbsp. oil in a large pot over high. Cook beef, breaking up with a spoon, until browned but not completely cooked through, 6–8 minutes. Transfer to a medium bowl with a slotted spoon, leaving as much fat in pan as possible.
  • Reduce heat to medium and cook onion for 5 minutes in the remaining 1 Tbsp. oil, then add bell peppers and garlic stirring until tender but not browned, another 3-5 minutes. Season with salt and black pepper.
  • Add cumin, paprika, oregano, and cayenne and cook, stirring, until fragrant, about 1 minute. Add tomato paste/sauce, veggie stock and reserved beef along with any accumulated juices to pot. Stir in sugar, 2 tsp. salt, and ¼ tsp. black pepper. Bring to a simmer and cook, stirring and scraping up any brown bits, until most of the liquid is evaporated, 15–20 minutes; taste and season with salt and black pepper, if needed. Stir in peas, corn, cilantro, and banana peppers. Transfer to a medium bowl, cover, and chill at least 3 hours.
  • While the filling is chilling, remove the chilled pastry dough from fridge and sit at room temp for 15 minutes. Place 2 large pieces of parchment paper in a work area and remove one round of dough. Place between parchment paper and roll out until 1/8 inch thick. If it breaks apart, knead in hands until it softens more. Cut with something circular and about 4 inches in diameter (I used a glass pyrex dish). Place between parchment paper or plastic wrap and stack with one layer of wrap between each completed round. Keep in large container in fridge while you continue with the rest of the dough. 
  • Preheat oven to 375°. Line 2 baking sheets with parchment paper (or silicone mat). Let dough sit at room temperature 15 minutes to temper.
  • Remove 6-8 rounds from bunch, keeping plastic divider underneath to make it easier to fold, and arrange on a baking pan. Place 2 Tbsp. filling in the center of each round. Top with 2 olive halves (optional). Brush water around half of outer edge of each round. Using plastic divider to help you, fold round over filling and pinch edges to seal. Using a fork, crimp edges. Remove plastic and transfer empanada to a parchment-lined sheet tray, spacing 1" apart. Repeat with remaining rounds (you’ll get about 12 empanadas on each tray).
  • Mix egg yolk and milk for egg wash. Brush the top of each empanada with wash. Omit for vegan.
  • Bake empanadas, rotating tray halfway through, until golden brown and slightly darker around the edges, 25–35 minutes.
  • Serve with fresh squeezed lemon and Cholula, if you like hot sauce 🙂
  • Do Ahead: Filling can be made 3 days ahead. Keep chilled. Unbaked empanadas can be made 3 months ahead; freeze on sheet tray, then transfer to freezer bags and keep frozen.

Notes

Do Ahead: Filling can be made 3 days ahead. Keep chilled. Unbaked empanadas can be made 3 months ahead; freeze on sheet tray, then transfer to freezer bags and keep frozen.

Pastry Dough (gf, df)

It's taken me years to find a good flakey pastry dough that doesn't have butter, but this one is the winner. Made with dairy-free cream cheese and vegan butter, this dough will definitely become a favorite for all of your pastry dough needs. Savory and sweet option by altering the cream cheese flavor.
Prep Time1 hour
Cook Time20 minutes
Total Time1 hour 20 minutes
Course: Breakfast
Keyword: pastry, pastry dough

Equipment

  • stand mixer

Ingredients

  • 1 8 oz container Kite Hill cream cheese plain for sweet dishes, but I love Everything flavor for savory, like empanadas
  • ¼ cup maple sugar granulated monk fruit, or coconut sugar (will slightly darken dough)
  • 1 cup arrowroot starch
  • 2 cups gluten-free flour blend
  • 1/3 cup almond flour
  • 1 tsp xanthan gum 1/2 tsp if flour blend already has it
  • 1 tsp sea salt
  • 1 8 oz package of Miyokos Vegan Butter palm shortening, or non-dairy butter of choice (cut into ¼ inch pieces and frozen for 15 min)
  • 2 tbsp ice water
  • 1 tbsp rice vinegar

Instructions

  • In the bowl of a stand mixer, mix cream cheese with sugar until smooth.
  • Add all flours, xanthan gum and salt on top of mixed cream cheese. Do not mix in quite yet.
  • Scatter cold butter over top of flours and mix all in with a hook attachment, until butter is the size of large peas.
  • Add water and rice vinegar and mix until dough comes together.
  • Divide dough into 5 even pieces.
  • Turn each piece of dough onto sheet of plastic wrap and flatten to make 5 inch disks.
  • Wrap each piece tightly in plastic and refrigerate for at least 1 hr, or overnight.
  • Before rolling out, let it sit on counter to soften slightly (about 10 min).
  • Bake as instructed for recipe. Can also make 2 days ahead and wrap in plastic wrap in fridge before using.

Notes

Can also make 2 days ahead and wrap in plastic wrap in fridge before using.

Blueberry Cookie Crumble Bars (vegan, gluten-free, paleo option)

Blueberry Cookie Crumble Bars (paleo, gluten-free, vegan)

Okay guys… this creation has me RULL excited. It’s free of toxic ingredients and is super easy to make. I made it with blueberries but you can switch in any berry of choice!
Prep Time15 minutes
Cook Time40 minutes
Total Time55 minutes
Course: Breakfast, Dessert, Snack
Keyword: blueberry oatmeal cookie bars, gluten-free, vegan
Servings: 15

Equipment

  • 8×8 baking dish
  • small saucepan

Ingredients

Oatmeal cookie layer:

  • 1 cup sprouted oats or shredded coconut for paleo
  • 1/2 cup almond or oat flour
  • 1/2 cup coconut flour
  • 3/4 tsp cinnamon
  • 1/2 tsp salt
  • 1/3 cup nut or seed butter
  • 1/3 cup monk fruit syrup or pure maple syrup
  • 1/4 cup coconut sugar
  • 1 tsp vanilla
  • 1 tsp baking powder

Berry layer:

  • 3 cups fresh or frozen blueberries or other berries
  • 1 tbsp lemon juice
  • 2 tbsp monk fruit syrup or pure maple syrup
  • 1/4 cup chia seeds
  • 1/2 tsp vanilla

Berry drizzle:

  • 2 tbsp blueberries
  • 1-2 tbsp water
  • 1/2 cup Lakanto powdered sugar
  • 1 tsp lemon juice
  • 1/2 tsp lemon zest

Instructions

  • Preheat oven to 350 and line an 8×8 baking dish with parchment paper
  • Combine the cookie layer in a bowl until well combined.
  • Press a little over half of the mixture into the baking pan and bake for 15 minutes.
  • Meanwhile, make the berry layer by placing the berries, lemon juice, and maple syrup in a small saucepan over medium-high heat. Crush the berries with a spoon until mushy. Remove from heat and stir the chia seeds and vanilla in.
  • When the cookie layer is done, spread the blueberry mixture evenly, then top with the remaining cookie mixture crumbles.
  • Bake for 20-25 minutes, or until golden brown. Cool on a wire rack.
  • While the bars are cooling, make the drizzle by blending the wet ingredients (starting with 1 tbsp water) in a blender, adding more water if necessary (you want to be able to drizzle it.)
  • Once cool, cut into bars and then drizzle the blueberry mixture over the top with a spoon.
  • Store in an airtight container on counter or fridge for 4-5 days.

Cinnamon Coffee Cake (paleo, gluten-free, dairy-free)

Cinnamon Coffee Cake (paleo, gluten-free, dairy-free)

Prep Time15 minutes
Cook Time35 minutes
Total Time50 minutes
Course: Breakfast
Keyword: coffee cake

Equipment

  • 8×8 baking pan
  • stand mixer or bowl

Ingredients

  • Crumb topping:
  • 1/2 cup almond or oat flour
  • 1/2 cup arrowroot or tapioca flour
  • 1/3 cup coconut maple, or monk fruit sugar
  • 1 1/2 tsp cinnamon
  • 1/4 cup ghee coconut oil, or grass-fed butter, cold and cut into bits
  • Coffee cake:
  • 1 1/2 cup almond or oat flour
  • 1/2 cup arrowroot flour
  • 3 tbsp coconut flour
  • 1/3 cup coconut, maple, or monk fruit sugar
  • 2 tsp cinnamon
  • 1/2 tsp baking soda
  • 1/4 tsp sea salt
  • 3 eggs at room temp
  • 1/4 cup non-dairy milk full-fat canned coconut is ideal
  • 1 tbsp lemon juice
  • 1 tsp vanilla extract
  • 3 tbsp coconut oil ghee, or grass-fed butter, softened
  • Glaze:
  • 1/2 cup monk fruit powdered sugar
  • 1/2 tsp cinnamon
  • 1 tbsp non-dairy milk full-fat coconut milk ideal

Instructions

  • Preheat oven to 350 F and line an 8×8 baking pan with parchment paper (grease any exposed sides)
  • In a small bowl, combine the crumb topping ingredients until broken into small clumps (I use a fork, or you could be official and use a pastry cutter). Place in fridge until ready to use.
  • In the bowl of a stand mixer, cream together the coconut oil and sugar until creamy. Add the eggs, one at a time, mixing in-between. Add the remaining wet ingredients and blend until smooth.
  • In a medium bowl, whisk together the dry ingredients. Slowly add them to the wet ingredients and mix until smooth.
  • Pour the mix into the prepared baking pan, then top with the crumb topping, distributing evenly.
  • Bake for 30-35 minutes, or until a toothpick comes out clean, or with just a few moist crumbs.
  • Cool on a wire rack. While waiting prepare the glaze. Once cool, drizzle the glaze over the cake and enjoy!
  • Stores best in airtight container in the fridge. Stays fresh for 4 days.

Chocolate Banana Bread (vegan option, paleo, protein-packed)

Vegan Chocolate Banana Bread (or muffins!) – Vegan, paleo, processed sugar-free

I love making different versions of banana bread, but I think this one just might be my favorite. Pro tip: It tastes like brownie bites in a mini muffin mold. You could also add a chocolate glaze to a doughnut version (or any version, no rules about chocolate here!)
Prep Time20 minutes
Total Time1 hour 10 minutes
Course: Breakfast, Dessert, Snack
Keyword: banana bread
Servings: 10

Equipment

  • Stand mixer or large mixing bowl
  • bread pan or silicone mold of choice

Ingredients

  • 4 tbsp ground flax for flax eggs or large organic pasture-raised eggs
  • 1/3 cup golden monk fruit or coconut sugar (I do a half and half combo)
  • 2 tsp vanilla extract
  • 1/4 cup melted coconut oil or grass-fed butter, or ghee
  • ¼ cup nut/seed butter
  • ¼ cup arrowroot or tapioca starch
  • 2 tbsp coconut flour
  • 3/4 cup almond flour
  • ½ cup plant-based protein powder
  • ¼-1/2 cup collagen (optional)
  • ¼ cup unsweetened cocoa powder
  • ½ tsp baking soda
  • ½ tsp baking powder
  • ½ tsp sea salt
  • ½ cup Lily’s stevia chocolate chips dairy-free chocolate chips, carob chips, or chopped nuts (optional)

Instructions

  • Preheat oven to 350 degrees. Line a 8X4 bread pan with parchment paper and spray, or spray any silicone mold you’re using.
  • Make flax eggs by combining 1 tbsp ground flax with 2.5 tbsp water for each egg. Let sit 10-15 minutes in fridge, or until gelatinous. If starting with whole flaxseed put in coffee grinder or high-speed blender and process until ground.
  • Melt the coconut oil and let it cool for about 5 minutes.
  • In a stand up mixer or large bowl, add the banana, (flax) eggs, oil, coconut sugar, and vanilla. Beat on low or mix until well combined.
  • In a medium bowl combine all of the dry ingredients.
  • Slowly add the dry ingredients to the wet ones in the mixer and combine on low-medium until a batter has formed and there are no clumps.
  • Divide the batter into the pan- will fill each one about 2/3 full.
  • Bake for 21-24 minutes, or until a knife comes out clean from the center.
  • Cool on wire rack until ready to gobble up (They release better from pans after almost cooled completely). Delicious with raw honey, peanut butter (obviously), or any other nut butter, ghee, jam, a sentimental movie and a good snuggle… basically anything.

Notes

Can make into any pan or silicone mold – muffin (bake 16-20 minutes), doughnut pan (line with parchment paper and bake for 40-50 min), or mini muffin (12-15 min).

Matcha Mint Bites (vegan, raw, paleo, keto)

Matcha Mint Bites

I love a good power bite, especially these energizing green balls of wonder. The fresh mint makes them especially refreshing, especially with these hot days. Pop them in a iced cooler for an outdoor day and you won't be sorry!
Prep Time30 minutes
Cook Time1 hour
Total Time1 hour 30 minutes
Servings: 24

Equipment

  • Food Processor

Ingredients

  • 1 cup raw, organic tahini
  • 1 cup coconut manna
  • 1 cup organic plant-based protein
  • 1 cup collagen
  • 2 cups + 1 cup shredded coconut
  • ¼ cup + ¼ cup monk-fruit confectioners sugar
  • 10-15 fresh organic mint leaves
  • 3-10 drops organic peppermint essential oil start tasting after adding 3 drops and adjust to preference
  • 2 tbsp matcha powder
  • 1 tbsp maca powder optional
  • 1 chocolate Lily’s chocolate bar or 1 cup Lily’s chocolate chips can use any chocolate of choice, optional
  • 1 tbsp MCT oil or melted coconut oil

Instructions

  • Melt the chocolate on the stove at low heat. Stir frequently until completely melted. Set aside.
  • Place 1 cup of the shredded coconut in a bowl and set aside.
  • Mix ingredients (except for monk fruit confectioners, and 1 tbsp MCT oil) in a food processor. Stop to scrape down the sides if needed. Add more protein powder if it’s not solid enough to roll into balls (they’ll be slightly squishy but you don’t want them to melt in your hand or flatten when set down.
  • Roll dough into 1 inch balls and then coat in the 1 cup shredded coconut. Place on cookie sheet. Will make 18-24 bites.
  • Stir ¼ cup confectioners and 1 tbsp MCT oil into the melted chocolate until well combined.
  • Drizzle or coat the bites with chocolate.
  • Place in the freezer for 10 minutes (until hard) and then transfer to the container.
  • Store in fridge for a week and in the freezer for 6 months.

Notes

notes: I always double or triple the batch and freeze them to have on hand for a quick boost. You can even eat them straight from the freezer.
Other flavor options:
Pure Matcha
Omit mint and/or chocolate
Lavender Matcha
Replace fresh mint with dried lavender flowers and mint essential oil with lavender oil
Lemon lavender
Replace fresh mint with dried lavender flowers and mint essential oil with lavender oil.
Add 1 tbsp fresh lemon zest, 5-10 drops lemon essential oil or 1 tbsp lemon juice and omit matcha.
Make it your own
Add any of your favorite superfoods, dried fruit, seeds, nuts, or flavor additions that you enjoy – the combinations are endless!

Power Bites (no-bake, paleo, vegan)

Power Bites

These power bites are super easy to make and store really well in the freezer. The no-cow bars are a new addition, and are only in here because I'm trying to go through about 6 boxes we have (got a little sick of them and then my bf forgot to cancel Amazon subscription haha). These are optional but could also be substituted.
Prep Time30 minutes
Total Time1 hour
Course: Dessert, Snack
Keyword: power bites
Servings: 20
Author: Kendyl Morris

Equipment

  • Food Processor

Ingredients

  • 10 pitted dates
  • optional: 2 No-Cow protein bars broken into chunks (if not using omit coconut milk)
  • 1/2 cup lakanto maple syrup raw honey, or maple syrup
  • 1 cup nut butter I used crunchy almond butter
  • 1 tsp vanilla extract
  • 1/4 cup plus more if needed, full-fat coconut milk
  • 1/2 cup protein powder I used Orgain peanut butter
  • 3 tbsp maca powder
  • 1/2 cup ground flaxseed
  • 3 tbsp cocoa powder plus about 1/2 cup more for rolling
  • Optional: 1/2 cup Lily’s chocolate chips melted

Instructions

  • Add everything (except extra cocoa powder and chocolate chips) to a food-processor and pulse until combined. Add more coconut milk by the tbsp if it won’t mix. You want it to be the consistency of play-dough so you can roll it into balls. Resort to mixing by hand if it’s being stubborn (once things are broken down enough to your liking.)
  • Put remaining cocoa powder in a small bowl. Place a piece of parchment paper on a baking pan (that will fit in your freezer for them to set)
  • Roll dough into balls and then roll in cocoa powder.
  • Drizzle melted chocolate over the bites and freeze for 30 minutes to set.
  • Store in container in fridge for 1 week, and any extra in freezer for up to 6 months.

Cookie Dough Power Bites (vegan, paleo, gluten-free)

These no-bake power bites are a delightful, energizing treat that are great for satiating a candy craving, or for fueling your workout. I created them when I was thinking of what to do with the excess No-Cow bars I have lying around because my boyfriend has a subscription on Amazon. We got sick of them and he forgot to cancel, so now we have them lying around. They have a chewy, cookie-dough like texture, are plant-based, 1g of sugar, and 21g protein. That’s hard to find in a protein bar, y’all. But, like I said, we overdid it so now we have too many.

I’m thrilled with how these turned out and will definitely make them again. They’re super easy to modify so make them your own!

Prep time: 15 minutes

Total time: 45 minutes (with 30 minutes of setting)

Yields: 8-12 bites

Ingredients

3 No-Cow protein bars (I like peanut butter cacao chip, can also sub any chewy vegan protein bar / cookie)

1/4 cup nut butter (I used peanut)

2 tbsp coconut oil

1 tbsp lakanto mapke syrup, raw honey, or pure maple syrup

6 drops monk fruit or stevia liquid

2 tbsp full fat coconut milk or other non-dairy milk

2 scoops vegan protein powder (I used @orgain peanut butter 😂, see a pattern?)

2 scoops collagen

3 tbsp maca powder

For the chocolate glaze:

1.5 cups Lily’s chocolate chips

1 tbsp coconut oil

Instructions:

  1. Melt the glaze ingredients in a glass bowl over a saucepan on a low simmer (or microwave)
  2. Chop the no cow bars into small pieces.
  3. Warm the peanut butter and coconut oil enough to mix.
  4. Add the remaining ingredients until a thick dough-like texture is formed.
  5. Form 8-12 small balls with the dough and then dip in the melted chocolate. Drop onto a parchment paper lined baking sheet.
  6. Freeze for at least 30 minutes and then store in a container in fridge or freezer.

Vegan Power Cookies

A delicious, nutrient-dense cookie that can pass as breakfast (well, not ideally, but we all have those days!). I always double batch and freeze half so I can have a quick on-the-go option for later.

Ingredients

1/2 cup nut butter

2 flax eggs (see below)

2 tbsp melted coconut oil

1/4 cup maple syrup, honey, or monk fruit maple syrup 

1/2 cup unsweetened applesauce, 1/2 cup unsweetened pumpkin puree, or 2 ripe mashed bananas

2 tsp vanilla extract

2/3 cup vegan peanut butter protein powder (or other flavor)

1/2 cup arrowroot flour

1 cup gf oats (I use these sprouted ones)

1/4 cup gf oat flour

1/4 cup almond flour

1/2 tsp baking soda

1/2 tsp baking powder

Pinch sea salt

1/2 cup Lily’s chocolate chips, or other dairy-free chocolate chip.

Instructions

  1. Preheat oven to 350 F and line a baking sheet with parchment paper.
  2. In a small bowl make flax eggs and let sit for 5 minutes, until gelatinous (2 eggs is 2 tbsp ground flaxseed mixed with 5 tbsp water)
  3. Mix the wet ingredients in the bowl of a stand mixer (or by hand!). 
  4. Mix the dry ingredients in a separate bowl and then slowly add to wet mixture, a little at a time, mixing in between until fully combined.
  5. Stir in the chocolate chips by hand.
  6. Using a cookie scoop to spoon, drop 12-14 small cookies onto baking sheet, spaced out at least 1 inch. Press down slightly.
  7. Bake for 15-18 minutes, or until golden brown on top.
  8. Remove from oven and place pan on wire rack for 10 minutes, then pull the parchment paper off the cookie sheet onto the wire rack until cooled completely.

Store at room temperature for a few days, or in fridge or freezer for longer shelf life.

Paleo Protein Pumpkin Doughnuts/Bread/Muffins with Ginger-Cardamom Glaze

This recipe is almost too good to be true. You can make it into doughnuts, bread, or muffins, and top with an irresistible frosting if you want to make it a little more dessert-y. I love adding protein powder and collagen to recipes, especially when you can’t even taste it, like with these.

Ingredients

Optional ginger cardamom glaze / frosting :

  • ½ cup powdered monk fruit or coconut sugar (blend granulated on high to make powdered)
  • ½ cup cacao butter, melted (for glaze) or palm shortening at room temp (for frosting)
  • 1 tsp vanilla extract
  • 1 tsp ground ginger
  • ½ tsp ground cardamom
  • ½ tsp fresh lemon juice
  • fresh zested ginger, lemon, or orange optional

Instructions

  1. Place a rack in the center of your oven and preheat the oven to 350 degrees F. Lightly coat a silicone doughnut mold, line a muffin tin with liners, or spray 8×4-inch loaf pan with nonstick spray – line with parchment paper so that the paper drapes over the sides like handles, then lightly coat with spray again.
  2. In a large bowl, stir together the almond flour, protein powder, arrowroot, collagen, salt, baking soda, and pumpkin spice. In bowl of stand mixer, whisk together pumpkin, maple syrup, coconut sugar, ghee, nut butter, and vanilla. Mix on medium and crack eggs as it’s mixing.
  3. Add the dry ingredients and mix again until well combined. Fold in any desired mix-ins.
  4. For doughnuts and muffins: Fill ⅔ full and bake for 20-25 minutes, or until knife comes out clean. For bread: Scrape into the prepared loaf pan and smooth the top. Bake for 42 to 48 minutes, until a toothpick inserted in the center comes out clean. Place the pan on a wire rack and let cool 30 minutes. Gently lift out the bread with the parchment overhang and place on the rack to finish cooling completely. The doughnuts are more tender so let them cool for at least an hour before gently pushing the bottom of the silicone mold to wiggle the doughnuts free.
  5. To make glaze: melt cacao butter in a saucepan on low. Remove from heat and whisk in rest of ingredients, except fresh ginger. Alternatively cream palm shortening with remaining ingredients. Drizzle (or spread frosting) over cooled bread, muffins, or doughnuts. Zest fresh ginger over the top. Place in fridge for 10 minutes to solidify and store for up to 5 days. 
  6. You can also pre-slice the bread without icing and store in the freezer for quick toast. 

Power Cookie Recipe

Paleo, dairy-free, gluten-free, keto

Prep Time: 10 minutes Cook Time: 10 minutes Yield: 1 dozen

Ingredients

Instructions

  1. Preheat oven to 350 F and line a baking sheet with parchment paper or a silicone mat.
  2. In a stand mixer or medium bowl, mix the nut butter, coconut sugar, vanilla, and eggs until smooth
  3. Add the rest of the ingredients and mix well, folding in the chocolate chips last
  4. Roll into 12 balls and flatten slightly. Place 1 inch apart on baking sheetBake for 10-14 minutes, or until golden brown on top
  5. Cool on baking sheet for 10 minutes, then place on wire rack until cooled completely. 
  6. Tag me on Instagram if you make them and hashtag to spread the love 🙂 @kendylmorris #powercookies

Notes- Double or triple recipe and freeze dough or cookies for up to 6 months. Bake as instructed for dough, or eat cold / thawed for pre-baked cookies.

Need help cleaning out your pantry? Check out the below link to see all my favorite clean products.